
2. Yara
1. What is Yara?
All about Yara "The pattern matching swiss knife for malware researchers (and everyone else)" (Virustotal., 2020) With such a fitting quote, Yara can identify information based on both binary and textual patterns, such as hexadecimal and strings contained within a file. Rules are used to label these patterns. For example, Yara rules are frequently written to determine if a file is malicious or not, based upon the features - or patterns - it presents. Strings are a fundamental component of programming languages. Applications use strings to store data such as text. For example, the code snippet below prints "Hello World" in Python. The text "Hello World" would be stored as a string.
print("Hello World!")We could write a Yara rule to search for "hello world" in every program on our operating system if we would like. Why does Malware use Strings?Malware, just like our "Hello World" application, uses strings to store textual data. Here are a few examples of the data that various malware types store within strings:
Botnet
12.34.56.7
The IP address of the Command and Control (C&C) server
2. Introduction to Yara Rules
The proprietary language that Yara uses for rules is fairly trivial to pick up, but hard to master. This is because your rule is only as effective as your understanding of the patterns you want to search for.
Using a Yara rule is simple. Every yara command requires two arguments to be valid, these are:
1) The rule file we create
2) Name of file, directory, or process ID to use the rule for.
Every rule must have a name and condition.
For example, if we wanted to use "myrule.yar" on directory "some directory", we would use the following command:
yara myrule.yar somedirectory
Note that .yar is the standard file extension for all Yara rules. We'll make one of the most basic rules you can make below.
1. Make a file named "somefile" via touch somefile
2. Create a new file and name it "myfirstrule.yar" like below:
Creating a file named somefile
cmnatic@thm:~$ touch somefileCreating a file named myfirstrule.yar
cmnatic@thm touch myfirstrule.yar3. Open the "myfirstrule.yar" using a text editor such as nano and input the snippet below and save the file:
rule examplerule {
        condition: true
}
Inputting our first snippet into "myfirstrule.yar" using nano
The name of the rule in this snippet is examplerule, where we have one condition - in this case, the condition is condition. As previously discussed, every rule requires both a name and a condition to be valid. This rule has satisfied those two requirements.
Simply, the rule we have made checks to see if the file/directory/PID that we specify exists via condition: true. If the file does exist, we are given the output of examplerule
Let's give this a try on the file "somefile" that we made in step one:
yara myfirstrule.yar somefile
If "somefile" exists, Yara will say examplerule because the pattern has been met - as we can see below:
Verifying our the examplerule is correct
If the file does not exist, Yara will output an error such as that below: Yara complaining that the file does not exist
3. Expanding on Yara Rules
Yara has a few conditions, which I encourage you to read here at your own leisure. However, I'll detail a few below and explain their purpose.
Keyword
Desc
Meta
Strings
Conditions
Weight
MetaThis section of a Yara rule is reserved for descriptive information by the author of the rule. For example, you can use desc, short for description, to summarise what your rule checks for. Anything within this section does not influence the rule itself. Similar to commenting code, it is useful to summarise your rule.
Strings
Remember our discussion about strings in Task 2? Well, here we go. You can use strings to search for specific text or hexadecimal in files or programs. For example, say we wanted to search a directory for all files containing "Hello World!", we would create a rule such as below:
We define the keyword Strings where the string that we want to search, i.e., "Hello World!" is stored within the variable $hello_world
Of course, we need a condition here to make the rule valid. In this example, to make this string the condition, we need to use the variable's name. In this case, $hello_world:
Essentially, if any file has the string "Hello World!" then the rule will match. However, this is literally saying that it will only match if "Hello World!" is found and will not match if "hello world" or "HELLO WORLD."
To solve this, the condition any of them allows multiple strings to be searched for, like below:
Now, any file with the strings of:1. Hello World!2. hello world3. HELLO WORLD Will now trigger the rule. Conditions
We have already used the true and any of them condition. Much like regular programming, you can use operators such as:
<= less than or equal to>= more than or equal to!= not equal to For example, the rule below would do the following:
The rule will now:
1. Look for the "Hello World!" string 2. Only say the rule matches if there are less than or equal to ten occurrences of the "Hello World!" string
Combining keywords
Moreover, you can use keywords such as:
andnotor To combine multiple conditions. Say if you wanted to check if a file has a string and is of a certain size (in this example, the sample file we are checking is less than <10 kb and has "Hello World!" you can use a rule like below:
The rule will only match if both conditions are true. To illustrate: below, the rule we created, in this case, did not match because although the file has "Hello World!", it has a file size larger than 10KB:Yara failing to match the file mytextfile because it is larger than 10kb
However, the rule matched this time because the file has both "Hello World!" and a file size of less than 10KB.Yara successfully matching the file mytextfile because it has "Hello World" and a file size of less than 10KB
Remembering that the text within the red box is the name of our rule, and the text within the green is the matched file.
Anatomy of a Yara Rule
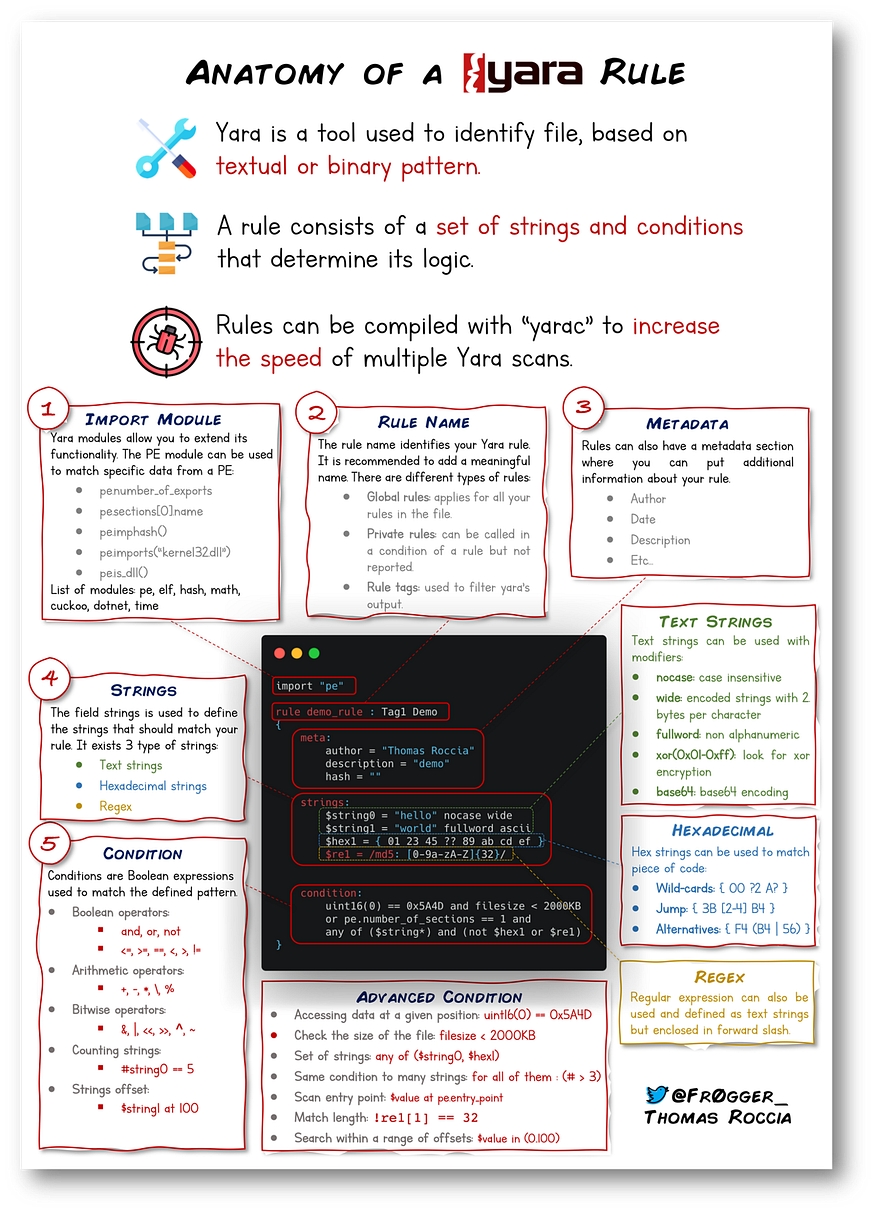
Information security researcher "fr0gger_" has recently created a handy cheatsheet that breaks down and visualises the elements of a YARA rule (shown above, all image credits go to him). It's a great reference point for getting started!
4. Other tools and Yara
Yara Tools
Knowing how to create custom Yara rules is useful, but luckily you don't have to create many rules from scratch to begin using Yara to search for evil. There are plenty of GitHub resources and open-source tools (along with commercial products) that can be utilized to leverage Yara in hunt operations and/or incident response engagements.
LOKI (What, not who, is Loki?)
LOKI is a free open-source IOC (Indicator of Compromise) scanner created/written by Florian Roth.
Based on the GitHub page, detection is based on 4 methods:
File Name IOC Check
Yara Rule Check (we are here)
Hash Check
C2 Back Connect Check
There are additional checks that LOKI can be used for. For a full rundown, please reference the GitHub readme.
LOKI can be used on both Windows and Linux systems and can be downloaded here.
Please note that you are not expected to use this tool in this room.
Displaying Loki's help menu
THOR (superhero named programs for a superhero blue teamer)
THOR Lite is Florian's newest multi-platform IOC AND YARA scanner. There are precompiled versions for Windows, Linux, and macOS. A nice feature with THOR Lite is its scan throttling to limit exhausting CPU resources. For more information and/or to download the binary, start here. You need to subscribe to their mailing list to obtain a copy of the binary. Note that THOR is geared towards corporate customers. THOR Lite is the free version.
Please note that you are not expected to use this tool in this room.
Displaying Thor Lite's help menu
FENRIR (naming convention still mythical themed)
This is the 3rd tool created by Neo23x0 (Florian Roth). You guessed it; the previous 2 are named above. The updated version was created to address the issue from its predecessors, where requirements must be met for them to function. Fenrir is a bash script; it will run on any system capable of running bash (nowadays even Windows).
Please note that you are not expected to use this tool in this room.
Running Fenrir
YAYA (Yet Another Yara Automaton)
YAYA was created by the EFF (Electronic Frontier Foundation) and released in September 2020. Based on their website, "YAYA is a new open-source tool to help researchers manage multiple YARA rule repositories. YAYA starts by importing a set of high-quality YARA rules and then lets researchers add their own rules, disable specific rulesets, and run scans of files."
Note: Currently, YAYA will only run on Linux systems.
Running YAYA
5. Using LOKI and its Yara rule set
As a security analyst, you may need to research various threat intelligence reports, blog postings, etc. and gather information on the latest tactics and techniques used in the wild, past or present. Typically in these readings, IOCs (hashes, IP addresses, domain names, etc.) will be shared so rules can be created to detect these threats in your environment, along with Yara rules. On the flip side, you might find yourself in a situation where you've encountered something unknown, that your security stack of tools can't/didn't detect. Using tools such as Loki, you will need to add your own rules based on your threat intelligence gathers or findings from an incident response engagement (forensics).
As mentioned before, Loki already has a set of Yara rules that we can benefit from and start scanning for evil on the endpoint straightaway.
Loki is located in the tools.
Listing the tools directory
Navigate to the Loki directory. Run python loki.py -h to see what options are available.
If you are running Loki on your own system, the first command you should run is --update. This will add the signature-base directory, which Loki uses to scan for known evil. This command was already executed within the attached VM.
Listing Loki signature-base directory
Navigate to the yara directory. Feel free to inspect the different Yara files used by Loki to get an idea of what these rules will hunt for.
To run Loki, you can use the following command (note that I am calling Loki from within the file 1 directory)
Instructing Loki to scan the suspicious file
6. Creating Yara rules with yarGen
From the previous section, we realized that we have a file that Loki didn't flag on. At this point, we are unable to run Loki on other web servers because if file 2 exists in any of the webs servers, it will go undetected.
We need to create a Yara rule to detect this specific web shell in our environment. Typically this is what is done in the case of an incident, which is an event that affects/impacts the organization in a negative fashion.
We can manually open the file and attempt to sift through lines upon lines of code to find possible strings that can be used in our newly created Yara rule.
Let's check how many lines this particular file has. You can run the following: strings <file name> | wc -l.
Using wc to count the amount of lines in the file
If you try to go through each string, line by line manually, you should quickly realize that this can be a daunting task.
Catting the output of 1ndex.php
Luckily, we can use yarGen (yes, another tool created by Florian Roth) to aid us with this task.
What is yarGen? yarGen is a generator for YARA rules.
From the README - "The main principle is the creation of yara rules from strings found in malware files while removing all strings that also appear in goodware files. Therefore yarGen includes a big goodware strings and opcode database as ZIP archives that have to be extracted before the first use."
Navigate to the yarGen directory, which is within tools. If you are running yarGen on your own system, you need to update it first by running the following command: python3 yarGen.py --update.
This will update the good-opcodes and good-strings DB's from the online repository. This update will take a few minutes.
Once it has been updated successfully, you'll see the following message at the end of the output.
Updating yarGen
To use yarGen to generate a Yara rule for file 2, you can run the following command:
python3 yarGen.py -m /home/cmnatic/suspicious-files/file2 --excludegood -o /home/cmnatic/suspicious-files/file2.yar
A brief explanation of the parameters above:
-mis the path to the files you want to generate rules for--excludegoodforce to exclude all goodware strings (these are strings found in legitimate software and can increase false positives)-olocation & name you want to output the Yara rule
If all is well, you should see the following output.
Using yarGen to generate a rule for file2
Generally, you would examine the Yara rule and remove any strings that you feel might generate false positives. For this exercise, we will leave the generated Yara rule as is and test to see if Yara will flag file 2 or no.
Note: Another tool created to assist with this is called yarAnalyzer (you guessed it - created by Florian Roth). We will not examine that tool in this room, but you should read up on it, especially if you decide to start creating your own Yara rules.
Further Reading on creating Yara rules and using yarGen:
7. Valhalla
Valhalla
Valhalla is an online Yara feed created and hosted by Nextron-Systems (erm, Florian Roth). By now, you should be aware of the ridiculous amount of time and energy Florian has dedicated to creating these tools for the community. Maybe we should have just called this the Florian Roth room. (lol)
Per the website, "Valhalla boosts your detection capabilities with the power of thousands of hand-crafted high-quality YARA rules."

From the image above, we should denote that we can conduct searches based on a keyword, tag, ATT&CK technique, sha256, or rule name.
Note: For more information on ATT&CK, please visit the MITRE room.
Taking a look at the data provided to us, let's examine the rule in the screenshot below:

We are provided with the name of the rule, a brief description, a reference link for more information about the rule, along with the rule date.
Feel free to look at some rules to become familiar with the usefulness of Valhalla. The best way to learn the product is by just jumping right in.
Picking up from our scenario, at this point, you know that the 2 files are related. Even though Loki classified the files are suspicious, you know in your gut that they are malicious. Hence the reason you created a Yara rule using yarGen to detect it on other web servers. But let's further pretend that you are not code-savvy (FYI - not all security professionals know how to code/script or read it). You need to conduct further research regarding these files to receive approval to eradicate these files from the network.
Last updated