
14. Fuzzing an Application with American Fuzzy Lop (AFL)
Exercise 14: Fuzzing an Application with American Fuzzy Lop (AFL)
In this lab, we will explore the process of fuzzing using the tool American Fuzzy Lop (AFL).
Lab Tasks
Log in to the Ub20 Fuzzing machine using studentpassword as Password.
Ensure that your Address Space Layout Randomization (ASLR) is disabled, open a terminal and type sudo sysctl kernel.randomize_va_space=0. This is not required for our fuzzing. However, often, when you have to build code repeatedly, you might forget that the ASLR is not disabled and waste time troubleshooting. Other aspects related to fuzzing need troubleshooting as well.
We will currently not address binary analysis and exploitation since we have a dedicated module for this.
Once you are logged in, open a terminal window.
We want to create a program to work with. In your favorite editor, enter the following program:
TypeCopy#include <stdio.h>
#include <string.h>

int main(void)
{
    char login[32];
    char passwd[32];
    printf("Login: \n");
    gets(login);
    printf("Password: \n");
    gets(passwd);
    if (strcmp(login, "root") == 0) {
        if (strcmp(passwd, "1qazxsw2") == 0) {
            printf("Access Granted.\n");
            return 0;
        }
    }
    printf("Access Denied.\n");
    return 1;
}
Save the program as aflfirsttest.c.
The program uses two character buffers of 32 characters: one to hold the username and the other to hold a password. To manage user input, we used the well-known insecure gets() function, which fails to check buffer boundaries and leads to buffer overflows.
Once executed, the program first asks for a username and a password. The inputs are stored in the login and passwd variables. Their values are then compared with the expected value using strcmp(). If the credentials entered are "root" and "1qazxsw2", then an "Access Granted." message is printed out to the console. Otherwise, "Access Denied." is displayed to the user, and the program exits.
We will compile this program with absolutely no memory protection, i.e. NX will be disabled and no stack canary. NX is usually enabled to prevent code from being executed directly from the stack, which there is no need for other than exploitation purposes. As for stack canaries, they can detect stack overflows by adding an extra value to the software stack. If this value is not found when the function returns, an exception is thrown to prevent further execution. Nowadays, these protection schemes are enabled in a vast majority of cases, but we adopt simplicity rather than realism for this post . These protection mechanisms can be disabled using the following GCC command:
gcc -fno-stack-protector -z execstack aflfirsttest.c -o aflfirsttest-gcc
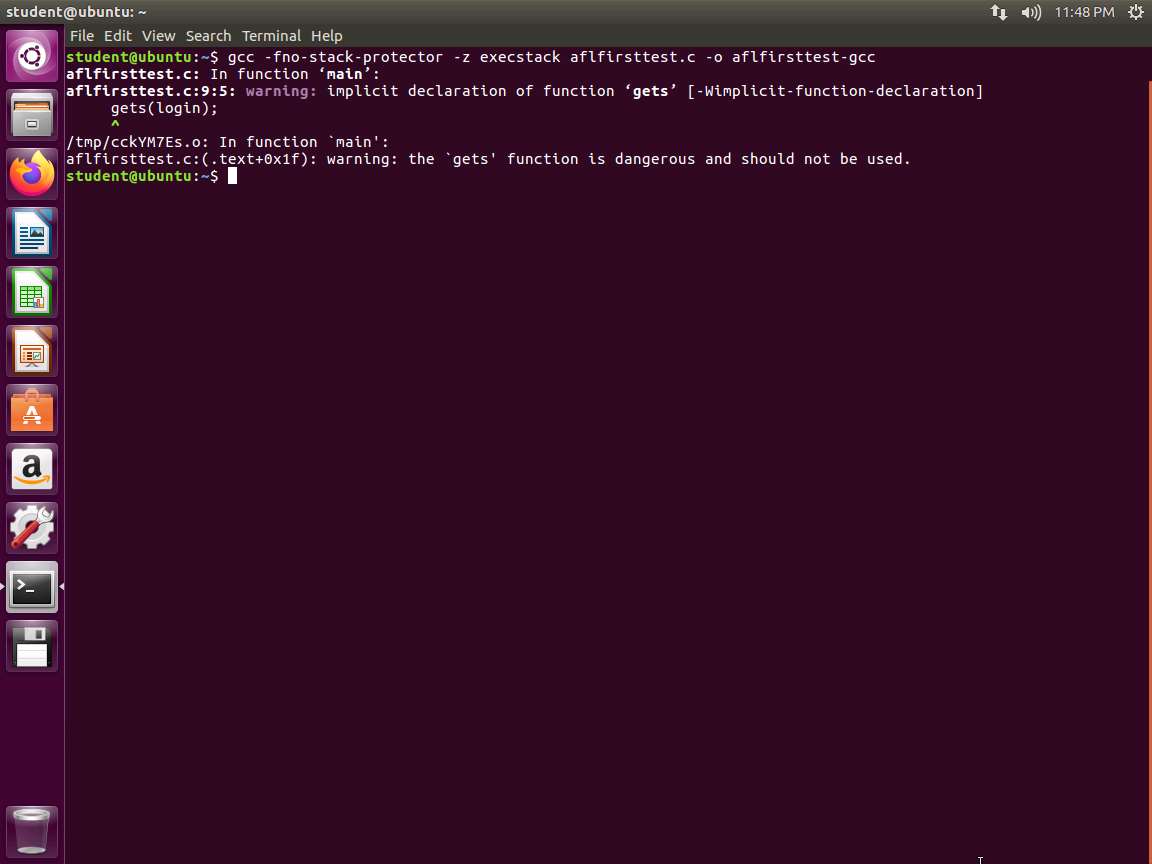
Screenshot The -fno-stack-protector will disable the stack canaries while the -z execstack makes both the heap and stack executable. To verify that these options have not been included, we can use a powerful tool called checksec, which is included with pwntools that we have installed on the machine. Enter checksec aflfirsttest-gcc. An example of this is shown in the following screenshot.
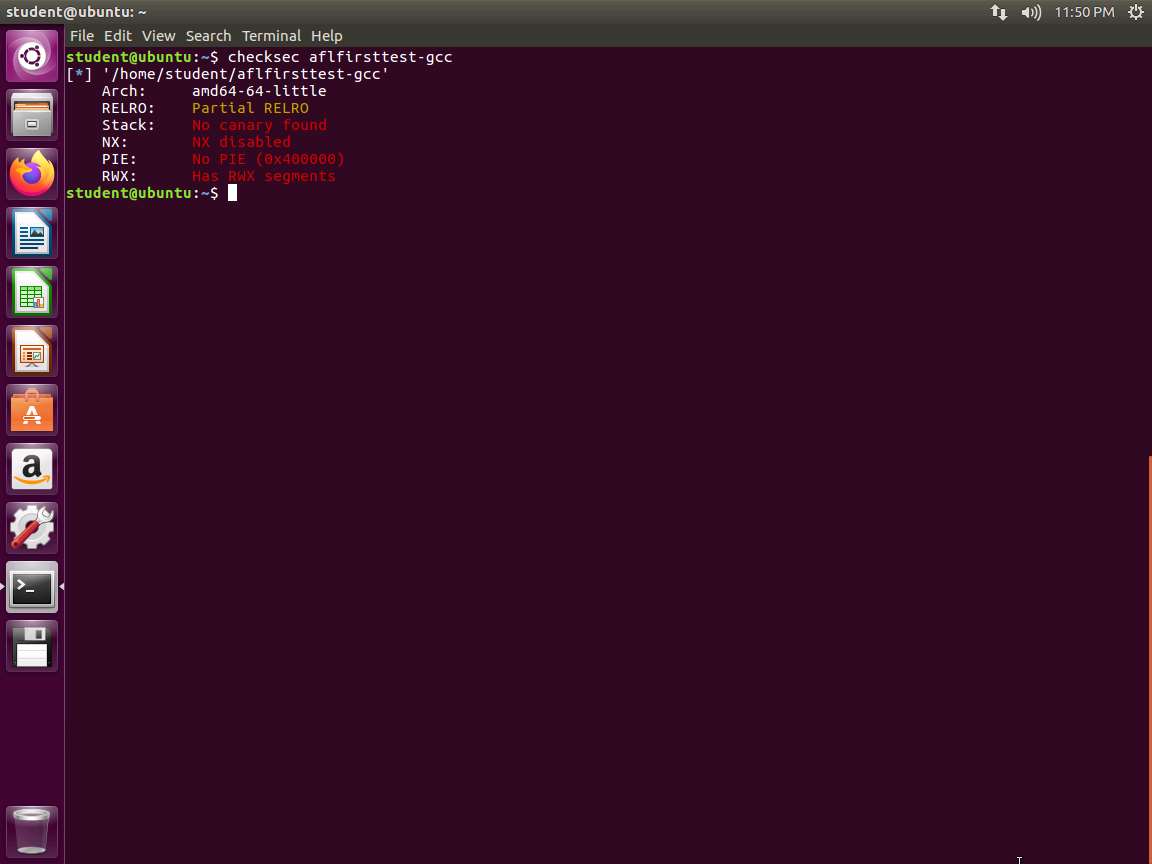
Screenshot Checksec reports on two additional security mechanisms other than the stack canaries and No-eXecute bit. Although these concepts are outside the scope of this lab, we will explain them briefly.
Relocation Read-Only (RELRO) is a technique used to relocate the sections of an ELF executable in order to prevent the Global Offset Table (GOT) from being overwritten due to an exploitable vulnerability.
Even though it is within the gdb, we will explain it here. PIE stands for Position Independent Executable and causes the program to be allocated at different memory locations on each execution, making it difficult to exploit it reliably. PIE is an implementation of the ASLR concept.
Now that our target has been created, we are ready to start fuzzing it to uncover the buffer overflow that it contains.
We will use AFL, which is a popular open-source and free fuzzer.
AFL has been leveraged to discover vulnerabilities in a large set of applications and libraries. Before starting AFL, we need to instrumentalize our target using the afl-gcc compiler. The AFL compiler will add code around the source in order to maximize coverage. To compile the source code with AFL, use the same command that was used earlier to compile aflfirsttest.c using afl-gcc instead of gcc, or use the associated Makefile.
In the terminal window, type afl-gcc -fno-stack-protector -z execstack aflfirsttest.c -o aflfirsttest-afl and press Enter. An example of the output from the command is shown in the following screenshot.
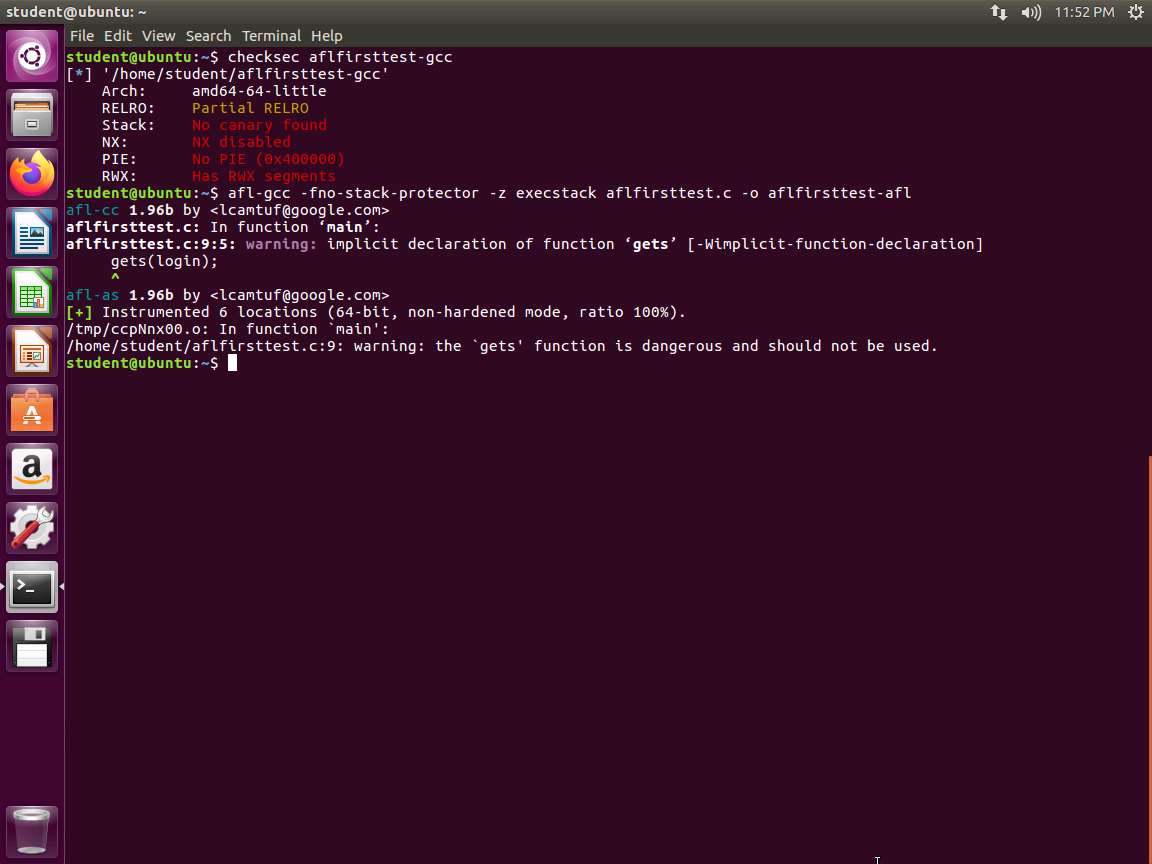
Screenshot Warnings are displayed as shown in the above screenshot, but we know that because it is deliberately written for testing and will work for our purposes .
The resulting binary is the one that will be used with AFL.
A critical aspect of fuzzing is crafting meaningful test cases, e.g. inputs that will maximize code coverage by exploring all potential paths of the targeted program. Our example program has the following three possible paths for input:
a. Username is invalid
b. Username is valid, but password is invalid
c. Username and password are valid
Therefore, to reach these three possible paths, the method is to design each test case with its own file.
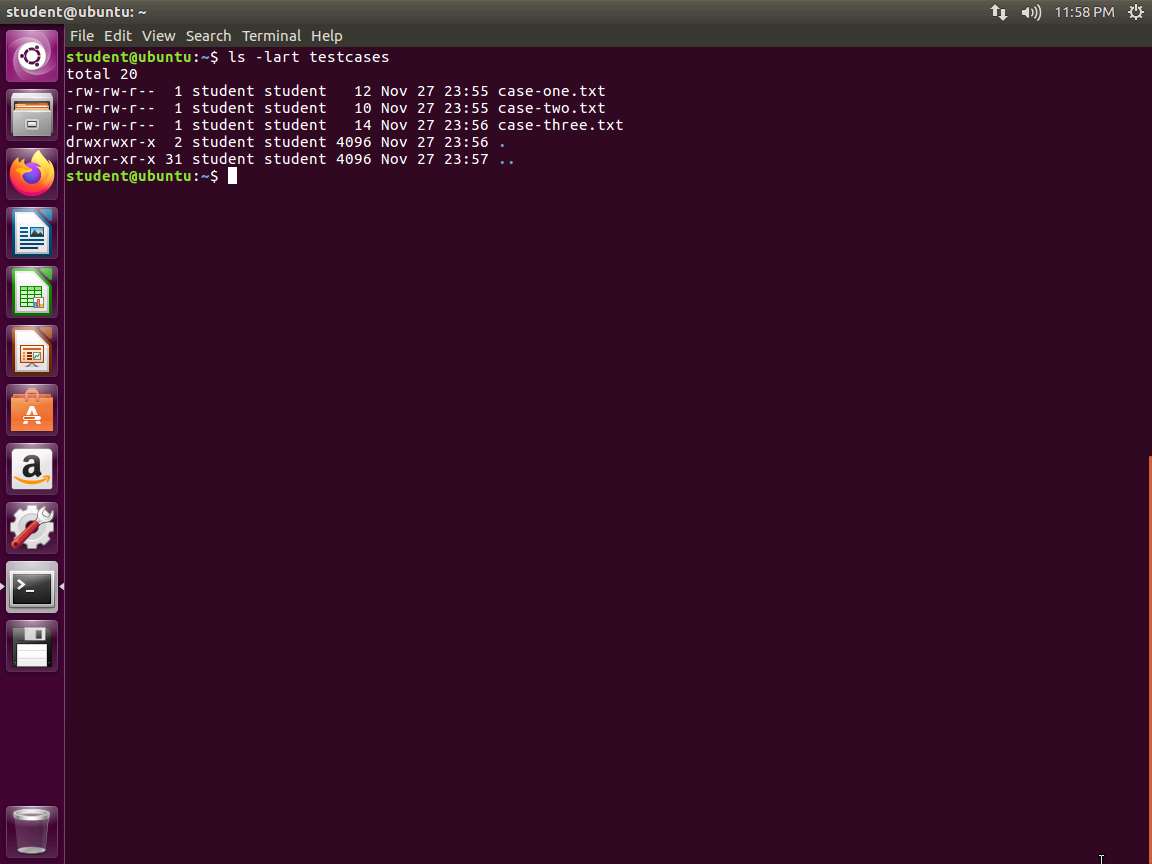
The first file will have two lines, none of which will contain appropriate credentials. The second file will have the right username, but an invalid password. The third file will have both correct credentials. AFL will read the contents of each file and feed each line to the stdin of Vuln1. Create a directory called testcases, and in it, create three files representing these cases. The names of the files do not matter. The data for each file are shown in the following table.

table.jpg Once you have created the files, create another directory for the results. You can simply call it results.
Create another directory for your three test cases called testcases, and move them there.
Once you have moved the files, type ls -lart testcases and verify that the output matches what is shown in the following screenshot.
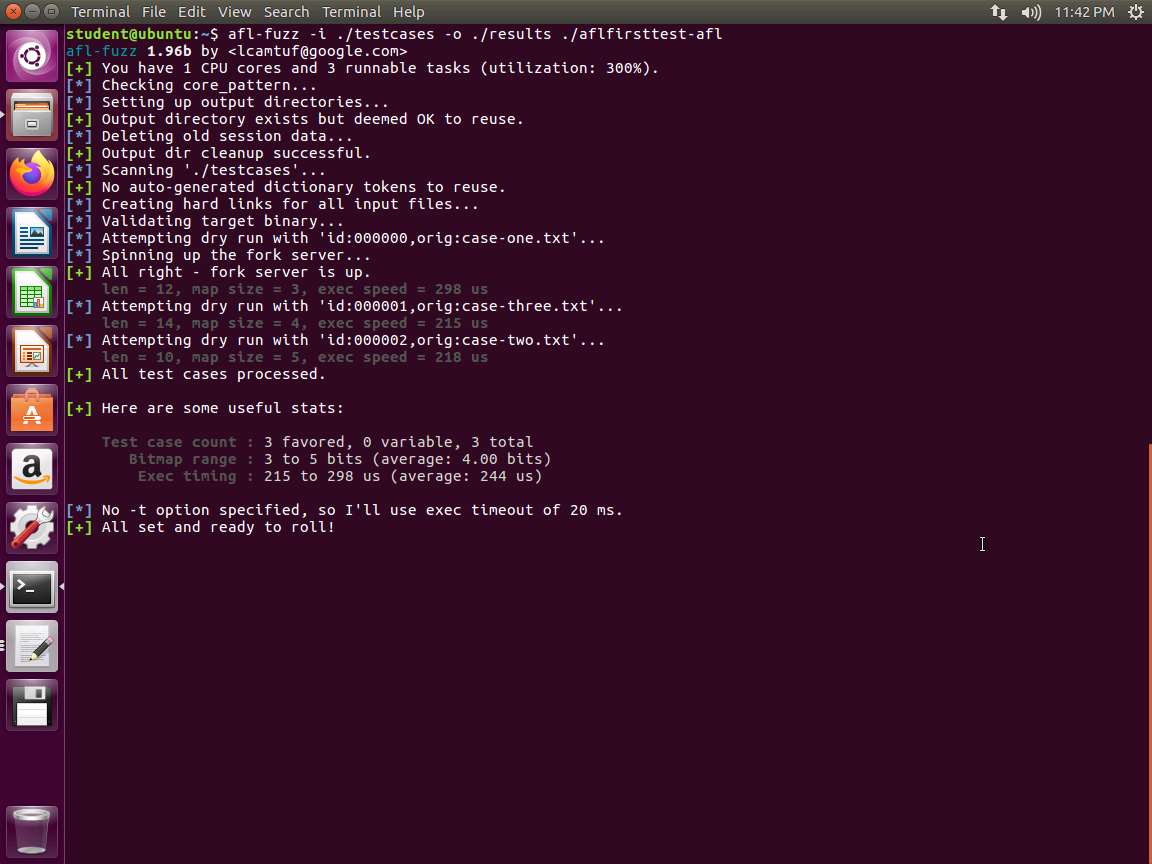
Screenshot At this point, we are ready to start the fuzz. Type afl-fuzz -i ./testcases -o ./results ./aflfirsttest-afl and press Enter. An example of the output of this command is shown in the following screenshot. This often occurs when you first run the program.
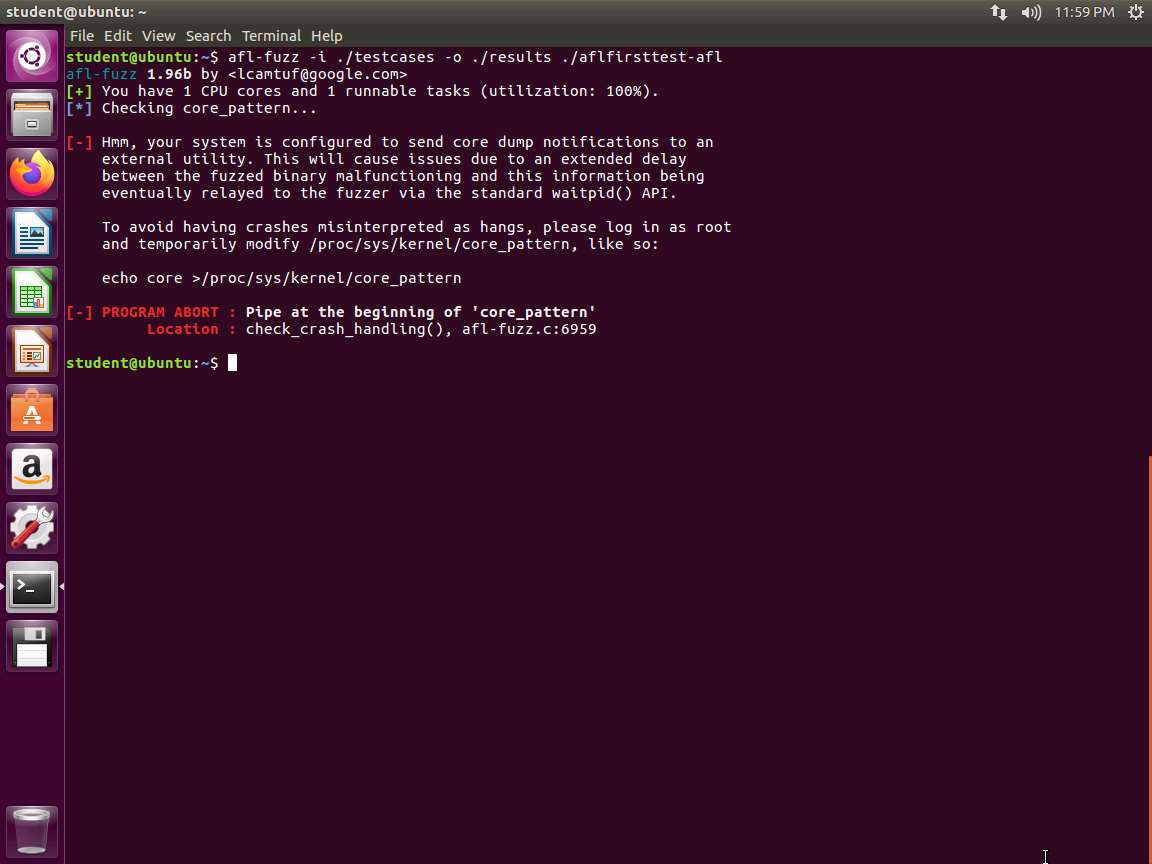
Screenshot All we have to do is follow the steps in the error message, open another window, and type sudo -i. Then type echo core > /proc/sys/kernel/core_pattern.
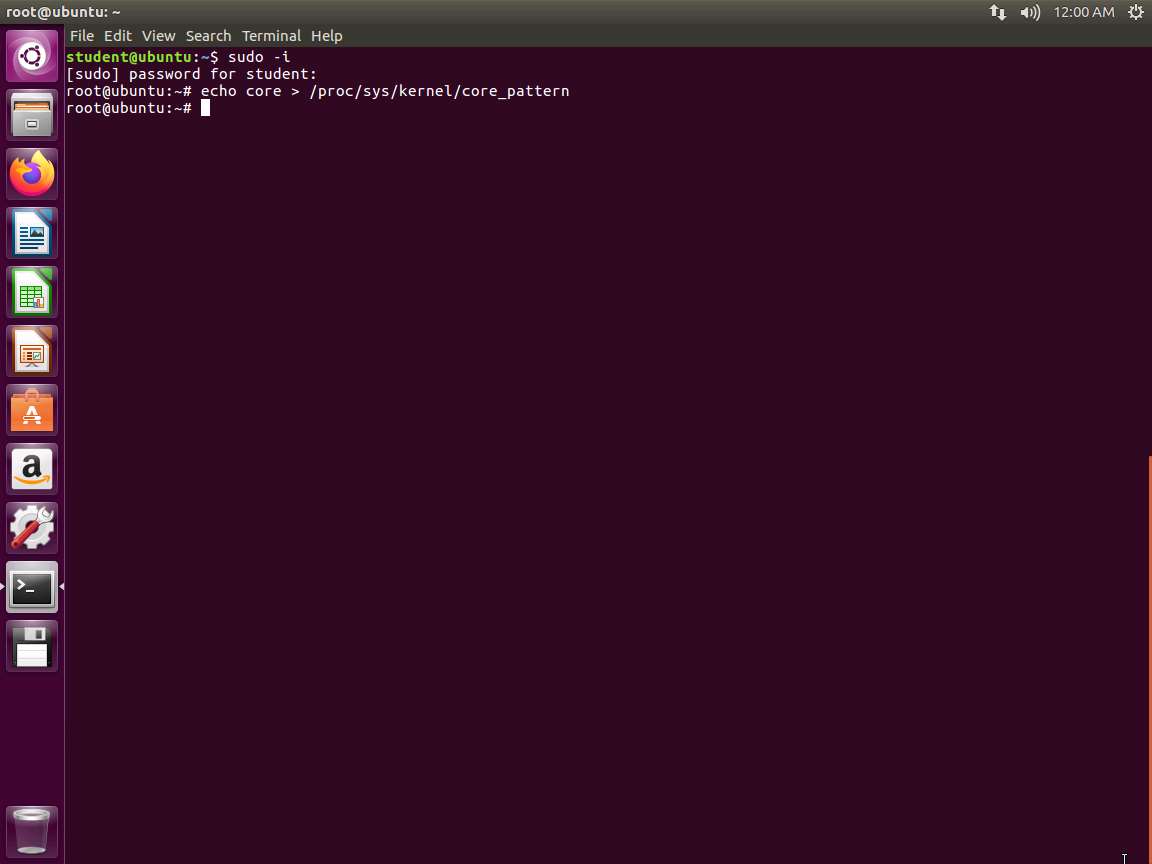
Screenshot We should now be able to again run our command in the original terminal window.
Screenshot You might have to go to an expanded screen if you get an error message. An example of this is shown in the following screenshot.
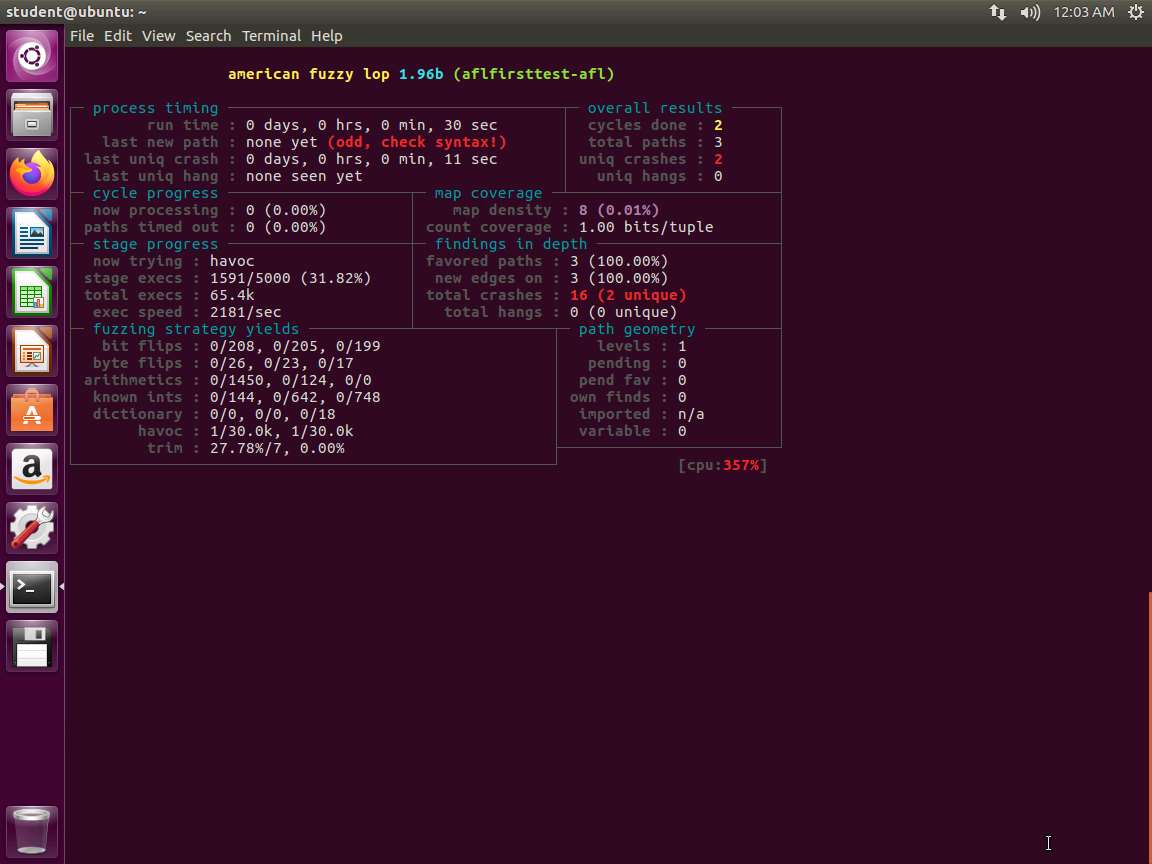
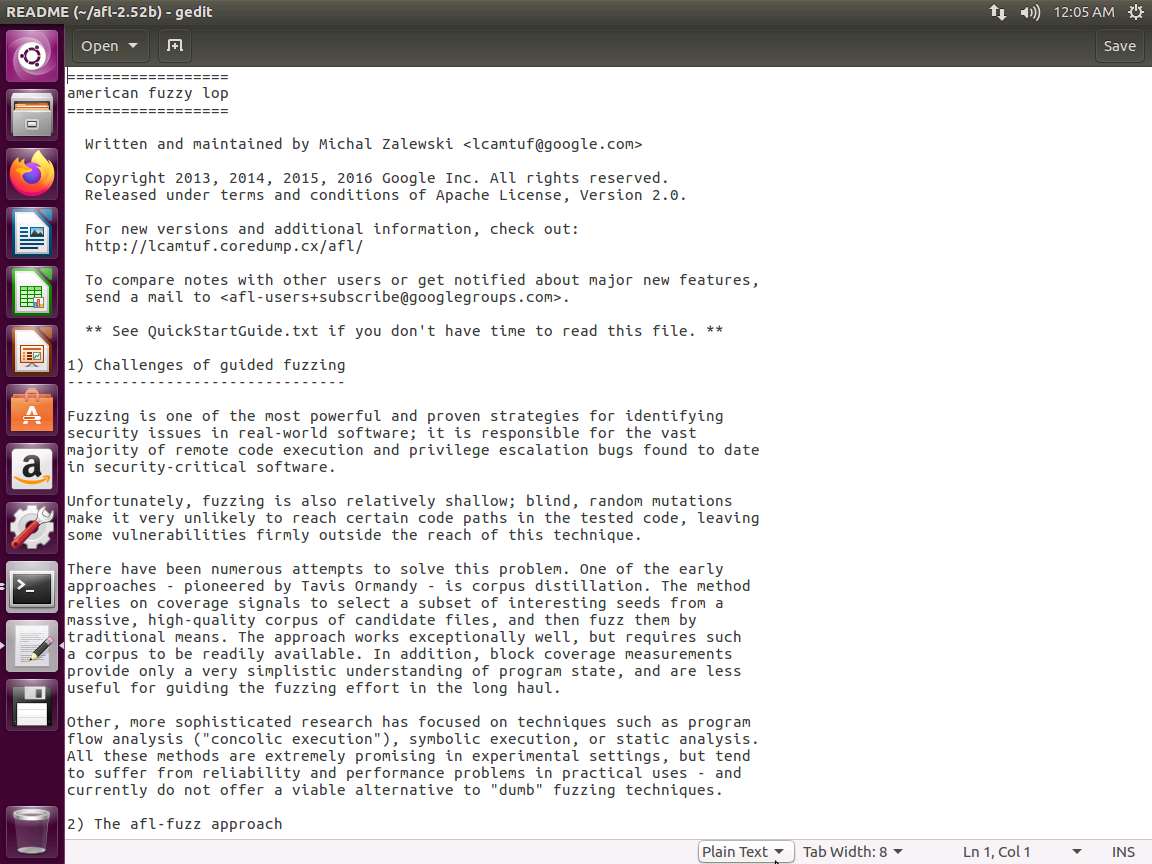
Screenshot Upon reviewing the image, you will see that there is quite a bit of data that you can review. We will not cover many of these due to time constraints . You are encouraged to research them. An excellent reference is the README file located at /home/student/afl-2.52b. An example of the beginning of the file is shown in the following screenshot.
Screenshot The output that you are looking at when the fuzzing tool is running has two sections that are of interest for us in this lab:
a. Total paths
b. Unique crashes
The output in your lab environment might differ from the output seen in the screenshot.
Each of these is shown in the following screenshots:
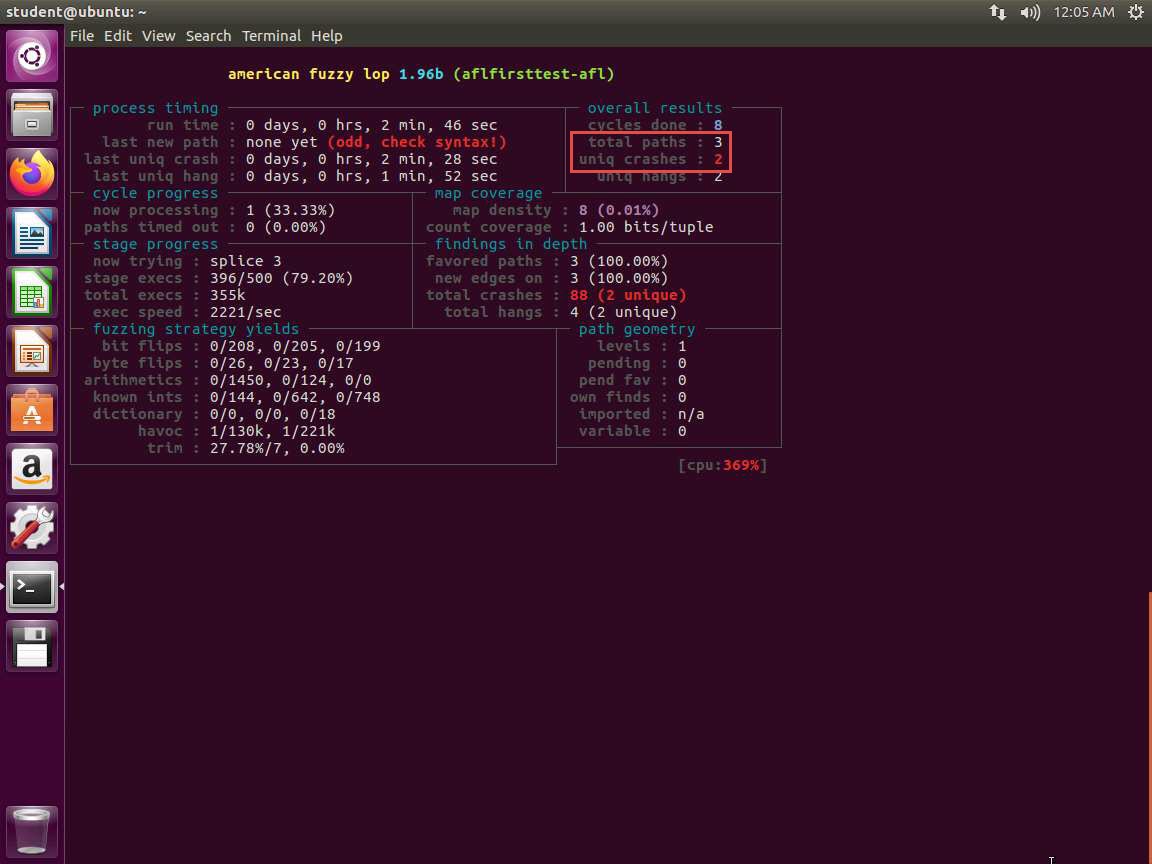
31.jpg We can break the run after sometime (approximately 1-2 minutes) by hitting Ctrl+C.
Before we start investigating unique crashes, we must look at two more things, namely the CPU and the exec speed. Both of these are shown in the following screenshot:
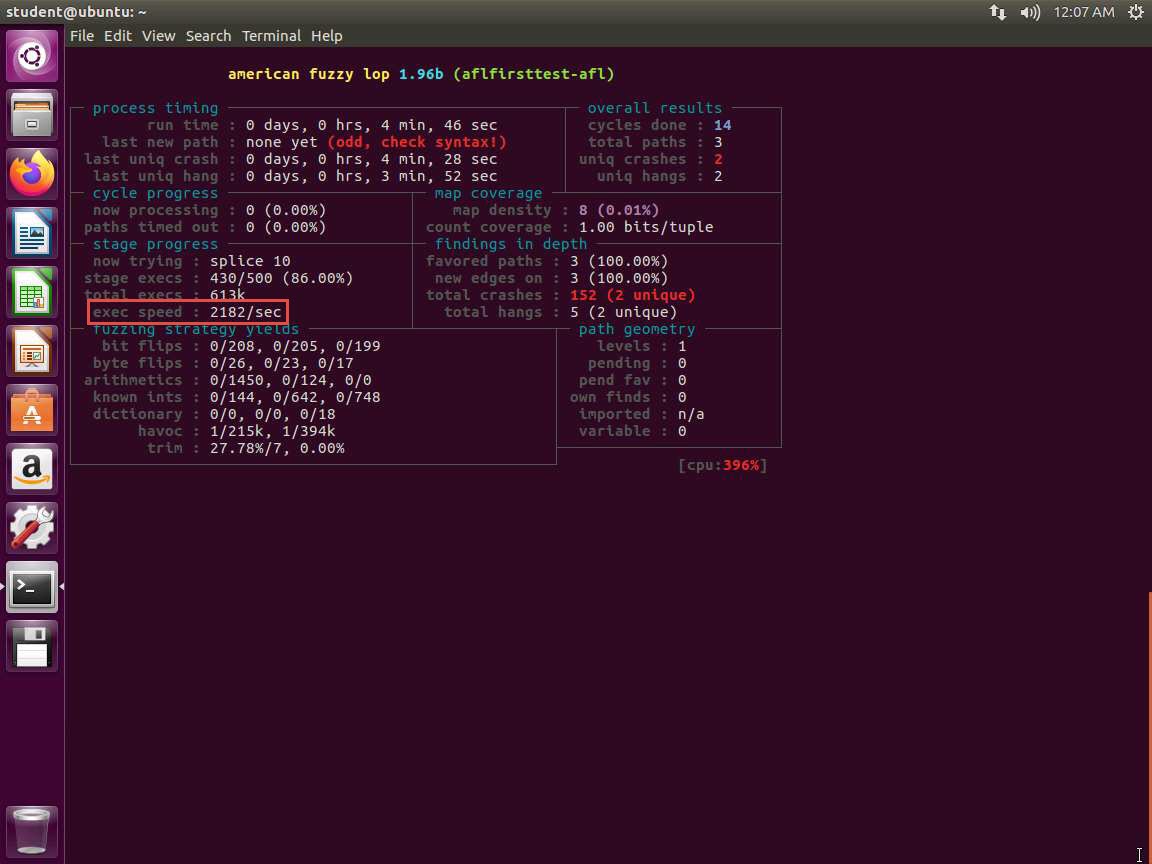
33.jpg Regarding the CPU, since we are running on a virtual machine and it has been configured for two CPUs with two cores each, we have a reasonable CPU load. When testing with only one processor and one core, the results showed 300% CPU load. Please note that this is something you will have to consider when you are fuzzing, as it takes extensive memory and resources.
Regarding the exec speed, here we are at maximum 5000/sec. The execution speed can significantly influence the effectiveness and efficiency of the testing process. Higher the exec speed, better the fuzzing process.
To look at the unique crashes, type ls -lart results/crashes and press Enter. The output of this command is shown in the following screenshot.
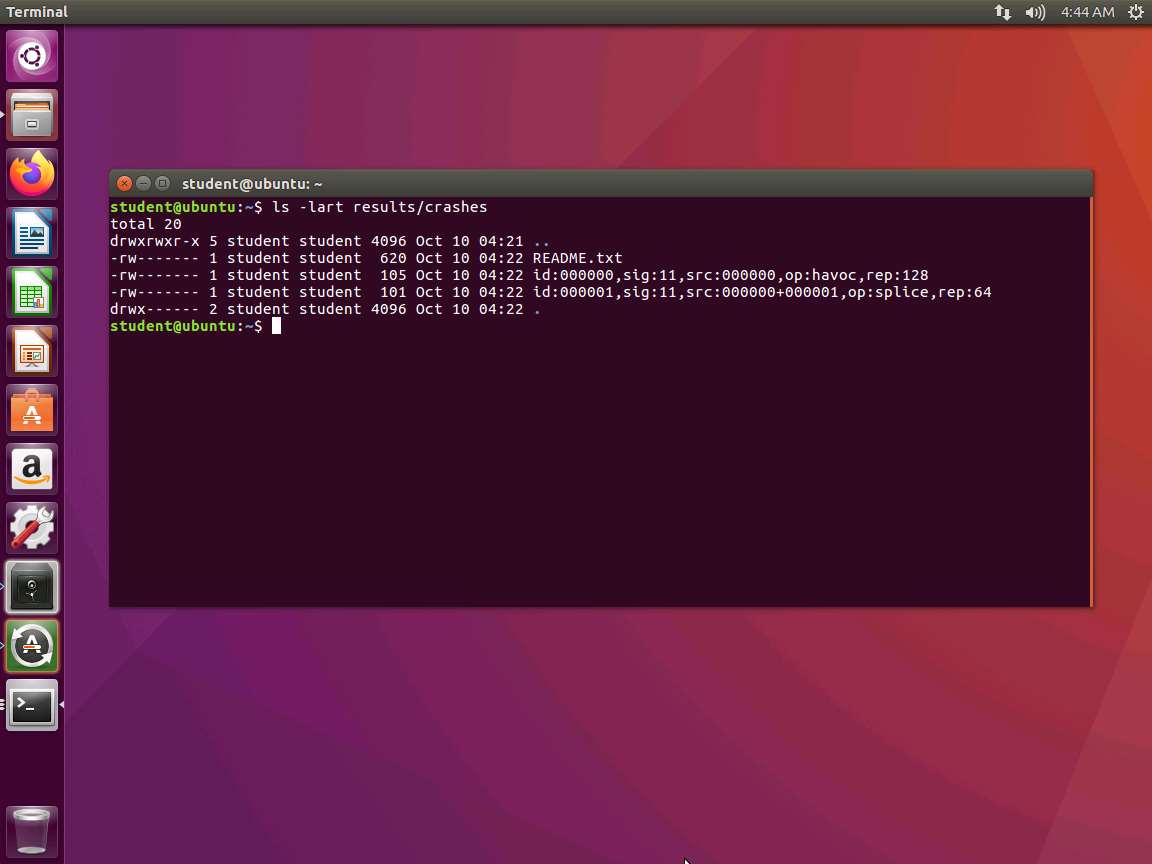
Each file contains a crash. Since it is signal 11, this means the crash possibly caused a segmentation fault. This lab does not explore exploitation in detail since there is a dedicated module on this, but we will work through the process with the AFL tool.
We need to take the crash data as an input and pipe it into our program. Change directory to ./results/crashes. In the terminal window, enter cat | ../../aflfirsttest-gcc.
Example: cat id:000000\,sig:11\,src:000000\,op:havoc\,rep:128 | ../../aflfirsttest-gcc
Note that "\" is required. Without it, the file will not be found it. An example of the output from the command is shown in the following screenshot.
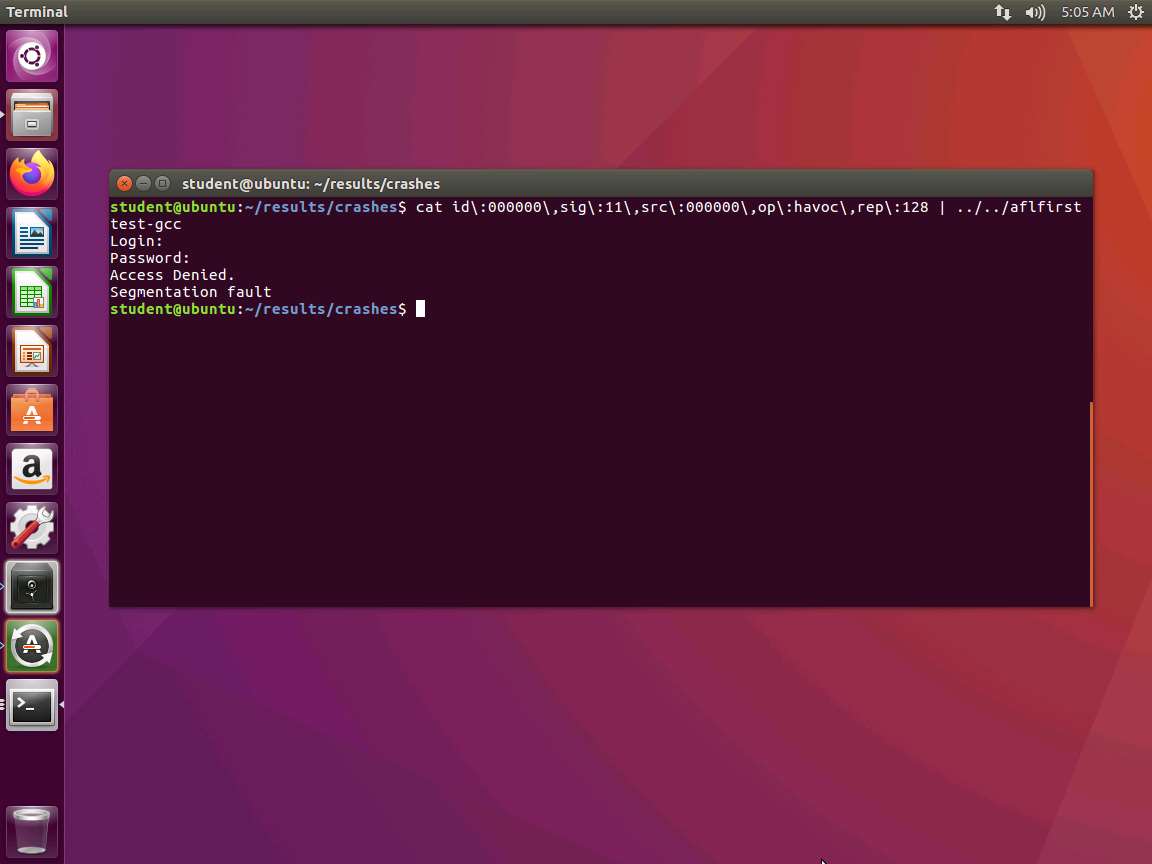
As you can see, our crash and the segmentation fault from the crash are displayed.
It is not necessary that all the fuzzing output strings display segmentation faults. A few might not contain those faults.
The next step would be to analyze the data. We know that we have a weak program since we created it.
The lab objectives have been achieved.
Last updated